Difference between revisions of "Getting Started"
m (Added a short Oh Sweet!) |
|||
| (148 intermediate revisions by 28 users not shown) | |||
| Line 1: | Line 1: | ||
| + | <noinclude>{{note/help|Please help us improve this page.|[[{{TALKPAGENAMEE}}#Improve the Getting Started page|Tell us how it could be improved]].}} | ||
| + | {{Translations | ||
| + | |[[Getting Started|english]] | [[Getting Started/lang-de|deutsch]] | [[Getting Started/lang-es|español]] | [[Getting Started/lang-fr|français]] | [[Getting Started/lang-pt|português]] }}</noinclude> | ||
| + | |||
| + | <center>[[File:Sugar-small.png]]</center> | ||
| + | |||
| + | <center><big><big><big>Oh sweet! The Constructionist Learning Environment</big></big></big></center> | ||
| + | |||
== About Sugar == | == About Sugar == | ||
| − | Sugar is a | + | Sugar is a constructionist learning desktop environment that is an alternative to the ones typically used in Microsoft Windows, Apple's OS X or other GNU/Linux operating systems. It is conceived as a platform upon which children learn with Sugar [[Activities]]. The platform provides mechanisms for [[Collaboration|collaboration]], [[Activities/Portfolio|reflection]], and [[View Source|exploration]]. Sugar Activities cover a broad range of applications: browsing, drawing, composing, writing, programming, etc. See this [http://www.sugarlabs.org/index.php?template=gallery&page=gallery gallery of screenshots]. |
| + | |||
| + | <gallery mode="slideshow"> | ||
| + | File:Sugarlabs-home-view.png | Sugar Desktop | ||
| + | File:Musicblocks_1.png | MusicBlocks - A sugar Activity | ||
| + | File:Neighborhood_sugarlabs.png | Collaboration on Sugar | ||
| + | </gallery> | ||
| + | |||
| + | [[Tutorials/Introduction to the Sugar Interface|Introduction to the Sugar Interface]] describes multiple full-screen views: a Home view, from which Activities are launched; a Neighborhood view, where learners can connect to each other through a [[olpc:Community Jabber Servers|Jabber network]]; a Journal view, which can be used as a ''lab notebook''; and the Activity view, where Sugar Activities are run. | ||
| + | |||
| + | Sugar Activities have no Save menu: everything is saved automatically. While the interface uses very little text, additional information is revealed when the user hovers over icons. | ||
| + | |||
| + | Sugar is Free Software. It is developed in [[wikipedia:Python_%28programming_language%29|Python]] and runs on a [[wikipedia:Linux|GNU/Linux]] [[wikipedia:Kernel_%28computer_science%29|Kernel]], originally from the [http://fedoraproject.org/ Fedora Project], and now from a [[Supported distributions|variety of GNU/Linux distributions]]. | ||
| + | |||
| + | For an overview of the components composing a Sugar system see the [[Sugar System Stack]]. | ||
| + | |||
| + | '''Developers''': Those interested in developing Sugar software should visit our [http://developer.sugarlabs.org/ developer documentation website]. | ||
| + | |||
| + | |||
| + | ==Getting Sugar== | ||
| + | |||
| + | <center> <big><big>Where do you want to install sugar? </big></big> </center> | ||
| + | |||
| + | <center>(Jump directly to installation, or read through for step-by-step instruction).</center> | ||
| + | <center> '''Quick Links : ''' [[#Hardware requirements]], [[#Sugar Live CD]], [[#Sugar on a Stick]], [[#Sugar on a Virtual_Machine]] </center> | ||
| + | |||
| + | <center><gallery> | ||
| + | File:Fedora_flat.png|link=Installation#Fedora | ||
| + | File:Ubuntu_flat.png|link=Installation#Ubuntu | ||
| + | File:Debian_logo.png|link=Installation#Debian | ||
| + | File:Arch-linux-logo.png|link=Installation#Arch_Linux | ||
| + | File:Windows_new.png|link=Installation#Windows | ||
| + | File:Apple_flat.png|link=Installation#Mac_OS | ||
| + | File:Rpi_logo.png|link=Installation#Raspberry_Pi | ||
| + | </gallery></center> | ||
| + | <center>Or scroll down to explore more on the various possibilities of Sugar OS !</center> | ||
| + | |||
| + | This section aims to be an introductory walkthrough of some of the methods of installing Sugar covered on the pages [[Sugar on a Stick/Installation]] and [[Supported systems]]. | ||
| + | |||
| + | ===Hardware requirements=== | ||
| + | |||
| + | * 1 GHz or faster processor | ||
| + | * 64-bit Processor | ||
| + | * 1 GB System Memory (RAM) | ||
| + | * The Sugar .iso file from [[Sugar on a Stick/Downloads]] | ||
| + | * 1 GB USB Drive (2 GB Recommended) or a Compact Disk (any) | ||
| + | * A compatible USB or CD port (any) | ||
| + | * USB Boot allowed on the BIOS (older PCs) | ||
| + | |||
| + | If your system requirements fall below those mentioned here, or you would like to check for alternatives, see [[Hardware_Requirements | Detailed Hardware Requirements]] | ||
| − | Sugar | + | == Installing Sugar == |
| + | Sugar can be installed as an Operating System installed on a Hard Drive, Live CD, or a USB Drive. Alternatively it supports almost all Debian-based and RHEL based Linux Operating Systems, and can be natively installed as a Desktop Environment. | ||
| + | See any of the OSes in [[#Getting Sugar]]. | ||
| − | == | + | ===Sugar Live CD=== |
| − | + | The Sugar LiveCD contains a complete, functioning Sugar distribution and operating system on CD. | |
| − | + | The Sugar LiveCD does not alter files already installed on your computer. It returns to its previous state when the LiveCD is ejected and the computer is rebooted. The Sugar LiveCD allows you to temporarily run Sugar; this allows you to explore Sugar and test how Sugar runs on your hardware. Your settings will not be saved between boots, but you can experiment with inserting a USB stick into the computer running the LiveCD, and reading from, and saving work to, the USB stick. | |
| − | + | ||
| − | + | Produce your LiveCD by downloading the Sugar on a Stick .iso image from [[Sugar on a Stick/Downloads]] and burning it onto a blank CD. | |
| − | |||
| − | + | Many computers have built in software which will convert and copy, "burn", an .iso image to a blank CD. In Windows 8 from the File Manager, right click the .iso file and select 'Burn disc image' from the context menu, or use a free utility, like [http://www.imgburn.com/ ImgBurn]. | |
| + | To run Sugar, insert your LiveCD into your computer and reboot into Sugar. | ||
| + | ===Sugar on a Stick=== | ||
| + | Sugar on a Stick (aka SOAS) is the USB implementation of Sugar for its portability and efficiency. There are many methods to create a SOAS. The downloaded sugar .iso from [[Sugar on a Stick/Downloads]] is then flashed (a bootable copying process) to a USB. For people who like GUI, there are Fedora Media Writer (Linux/Windows), UNetBootin (Linux, Mac, Windows), Rufus (Windows), etc. For command line interfaces, see ''livecd-iso-to-disk'' on [[Sugar on a Stick/Installation]] | ||
| − | |||
| − | + | ===Sugar on a Virtual Machine=== | |
| − | + | The advantage of a Virtual Machine (VM) is that, with the full VM documentation provided online, you follow that documentation to install the VM on your PC or Mac. VirtualBox<sup>®</sup> is a suitable choice of VM for a first attempt, see their website: https://www.virtualbox.org/ | |
| − | [[ | + | As ever, download the Sugar on a Stick .iso from [[Sugar on a Stick/Downloads]] |
| − | + | Open the VM, bind the .iso image to the VM and boot it. | |
| − | + | All VMs have excellent documentation on how to boot an .iso and again it is covered on this page [[Sugar on a Stick/Installation#SoaS on VirtualBox]] and the method to make a Sugar on a Stick from your VM, is covered here [[Sugar on a Stick/Installation#with Microsoft Windows]] in Method 3, Launch a virtual machine with the Sugar on a Stick .iso file, then run the script, livecd-iso-to-disk | |
| + | = Projects = | ||
| + | == Sugarizer == | ||
| + | Sugarizer is a free/libre learning platform. The Sugarizer UI use ergonomic principles from The Sugar platform, developed for the One Laptop per Child project and used every day by more than 2 million children around the world. | ||
| + | Sugarizer runs on every device: from Raspberry Pi computers to Android and iOS phones to tablets and to laptops and desktops. | ||
| − | + | Sugarizer includes a bunch of pedagogic activities thought for children, see here for more. | |
| − | + | Sugarizer is available as: | |
| − | + | Application: an installable app for every operating system | |
| + | Web Application: a web application that runs in modern web browsers | ||
| − | + | Sugarizer is not a fork of sugar. To know more or to sugarizer, click [[https://github.com/llaske/sugarizer#what-is-sugarizer- here]] | |
| + | Or try me now here [[http://try.sugarizer.org/]] | ||
| + | == MusicBlocks == | ||
| + | Music Blocks is a collection of manipulative tools for exploring fundamental musical concepts in an integrative and fun way. | ||
| + | <gallery mode=packed heights=200px> | ||
| + | File:Mb2.png | ||
| + | File:Mb4.png | ||
| + | </gallery> | ||
| + | Try it right away in your browser : [[https://musicblocks.sugarlabs.org/]] | ||
| + | For more information, check out the [[https://github.com/sugarlabs/musicblocks GitHub repository]] for Installation instructions and other information. | ||
| + | == TurtleBlocks == | ||
| + | Turtle Art, also known as Turtle Blocks, is an activity with a Logo-inspired graphical "turtle" that draws colorful art based on snap-together visual programming elements. Its "low floor" provides an easy entry point for beginners. It also has "high ceiling" programming, graphics, mathematics, and Computer Science features which will challenge the more adventurous student. | ||
| + | Try it now [[https://turtle.sugarlabs.org/]]. | ||
| + | For more information, check out the [[https://github.com/sugarlabs/turtleart-activity GitHub repository]] for Installation instructions and other information. | ||
| − | ''' | + | == Please Explore Sugar == |
| + | :'''and take it out into your community''' | ||
| − | + | There are two further pages in the Getting Started set. | |
| + | : Once you are able to launch Sugar, see [[Getting Started/Explore]]. | ||
| + | ::If you can take Sugar out into your school or community, see [[Getting Started/Presentation]] for ideas on how to demonstrate it to others. | ||
| − | |||
| − | + | == I need more information == | |
| + | See https://help.sugarlabs.org, the Activity Help provided online. | ||
| − | + | The Sugar Labs wiki is a collaboration site for [[Sugar Labs]] teams, the [[Sugar on a Stick]] project alone comprises over 75 pages or sub-pages. For an overview of the developing SoaS see [[Sugar on a Stick/Project sitemap]]. | |
| − | + | Find The Sugar Learning Platform Homepage at http://www.sugarlabs.org/. | |
| − | + | ==Release notes== | |
| − | + | Release notes for '''Sugar {{Current Stable Release}}''' are available [[{{Current Stable Release}}/Notes|here]]. | |
| + | {{Template:Platform Cycle Linkbar}} | ||
| − | [[Category: | + | [[Category:Help]] |
| + | [[Category:HowTo]] | ||
| + | [[Category:Getting started]] | ||
Latest revision as of 03:59, 26 March 2020

About Sugar
Sugar is a constructionist learning desktop environment that is an alternative to the ones typically used in Microsoft Windows, Apple's OS X or other GNU/Linux operating systems. It is conceived as a platform upon which children learn with Sugar Activities. The platform provides mechanisms for collaboration, reflection, and exploration. Sugar Activities cover a broad range of applications: browsing, drawing, composing, writing, programming, etc. See this gallery of screenshots.

Sugar Desktop
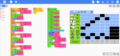
MusicBlocks - A sugar Activity
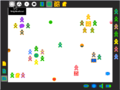
Collaboration on Sugar


Introduction to the Sugar Interface describes multiple full-screen views: a Home view, from which Activities are launched; a Neighborhood view, where learners can connect to each other through a Jabber network; a Journal view, which can be used as a lab notebook; and the Activity view, where Sugar Activities are run.
Sugar Activities have no Save menu: everything is saved automatically. While the interface uses very little text, additional information is revealed when the user hovers over icons.
Sugar is Free Software. It is developed in Python and runs on a GNU/Linux Kernel, originally from the Fedora Project, and now from a variety of GNU/Linux distributions.
For an overview of the components composing a Sugar system see the Sugar System Stack.
Developers: Those interested in developing Sugar software should visit our developer documentation website.
Getting Sugar


This section aims to be an introductory walkthrough of some of the methods of installing Sugar covered on the pages Sugar on a Stick/Installation and Supported systems.
Hardware requirements
- 1 GHz or faster processor
- 64-bit Processor
- 1 GB System Memory (RAM)
- The Sugar .iso file from Sugar on a Stick/Downloads
- 1 GB USB Drive (2 GB Recommended) or a Compact Disk (any)
- A compatible USB or CD port (any)
- USB Boot allowed on the BIOS (older PCs)
If your system requirements fall below those mentioned here, or you would like to check for alternatives, see Detailed Hardware Requirements
Installing Sugar
Sugar can be installed as an Operating System installed on a Hard Drive, Live CD, or a USB Drive. Alternatively it supports almost all Debian-based and RHEL based Linux Operating Systems, and can be natively installed as a Desktop Environment. See any of the OSes in #Getting Sugar.
Sugar Live CD
The Sugar LiveCD contains a complete, functioning Sugar distribution and operating system on CD.
The Sugar LiveCD does not alter files already installed on your computer. It returns to its previous state when the LiveCD is ejected and the computer is rebooted. The Sugar LiveCD allows you to temporarily run Sugar; this allows you to explore Sugar and test how Sugar runs on your hardware. Your settings will not be saved between boots, but you can experiment with inserting a USB stick into the computer running the LiveCD, and reading from, and saving work to, the USB stick.
Produce your LiveCD by downloading the Sugar on a Stick .iso image from Sugar on a Stick/Downloads and burning it onto a blank CD.
Many computers have built in software which will convert and copy, "burn", an .iso image to a blank CD. In Windows 8 from the File Manager, right click the .iso file and select 'Burn disc image' from the context menu, or use a free utility, like ImgBurn.
To run Sugar, insert your LiveCD into your computer and reboot into Sugar.
Sugar on a Stick
Sugar on a Stick (aka SOAS) is the USB implementation of Sugar for its portability and efficiency. There are many methods to create a SOAS. The downloaded sugar .iso from Sugar on a Stick/Downloads is then flashed (a bootable copying process) to a USB. For people who like GUI, there are Fedora Media Writer (Linux/Windows), UNetBootin (Linux, Mac, Windows), Rufus (Windows), etc. For command line interfaces, see livecd-iso-to-disk on Sugar on a Stick/Installation
Sugar on a Virtual Machine
The advantage of a Virtual Machine (VM) is that, with the full VM documentation provided online, you follow that documentation to install the VM on your PC or Mac. VirtualBox® is a suitable choice of VM for a first attempt, see their website: https://www.virtualbox.org/
As ever, download the Sugar on a Stick .iso from Sugar on a Stick/Downloads
Open the VM, bind the .iso image to the VM and boot it.
All VMs have excellent documentation on how to boot an .iso and again it is covered on this page Sugar on a Stick/Installation#SoaS on VirtualBox and the method to make a Sugar on a Stick from your VM, is covered here Sugar on a Stick/Installation#with Microsoft Windows in Method 3, Launch a virtual machine with the Sugar on a Stick .iso file, then run the script, livecd-iso-to-disk
Projects
Sugarizer
Sugarizer is a free/libre learning platform. The Sugarizer UI use ergonomic principles from The Sugar platform, developed for the One Laptop per Child project and used every day by more than 2 million children around the world.
Sugarizer runs on every device: from Raspberry Pi computers to Android and iOS phones to tablets and to laptops and desktops.
Sugarizer includes a bunch of pedagogic activities thought for children, see here for more.
Sugarizer is available as:
Application: an installable app for every operating system Web Application: a web application that runs in modern web browsers
Sugarizer is not a fork of sugar. To know more or to sugarizer, click [here] Or try me now here [[1]]
MusicBlocks
Music Blocks is a collection of manipulative tools for exploring fundamental musical concepts in an integrative and fun way.


Try it right away in your browser : [[2]] For more information, check out the [GitHub repository] for Installation instructions and other information.
TurtleBlocks
Turtle Art, also known as Turtle Blocks, is an activity with a Logo-inspired graphical "turtle" that draws colorful art based on snap-together visual programming elements. Its "low floor" provides an easy entry point for beginners. It also has "high ceiling" programming, graphics, mathematics, and Computer Science features which will challenge the more adventurous student. Try it now [[3]]. For more information, check out the [GitHub repository] for Installation instructions and other information.
Please Explore Sugar
- and take it out into your community
There are two further pages in the Getting Started set.
- Once you are able to launch Sugar, see Getting Started/Explore.
- If you can take Sugar out into your school or community, see Getting Started/Presentation for ideas on how to demonstrate it to others.
I need more information
See https://help.sugarlabs.org, the Activity Help provided online.
The Sugar Labs wiki is a collaboration site for Sugar Labs teams, the Sugar on a Stick project alone comprises over 75 pages or sub-pages. For an overview of the developing SoaS see Sugar on a Stick/Project sitemap.
Find The Sugar Learning Platform Homepage at http://www.sugarlabs.org/.
Release notes
Release notes for Sugar 0.112 are available here.
Sugar platform release version cycle: | 0.82 | 0.84 | 0.86 | 0.88 | 0.90 | 0.92 | 0.94 | 0.96 | 0.98 | 0.100 | 0.102 | 0.104 | 0.106 | 0.108 | 0.110 | 0.112 |