Difference between revisions of "SoaS Blueberry Instructions"
Jump to navigation
Jump to search
(→For GNU/Linux Users: reword) |
|||
| Line 22: | Line 22: | ||
* If you are a '''Fedora User''', run the following command: ''yum install liveusb-creator'' | * If you are a '''Fedora User''', run the following command: ''yum install liveusb-creator'' | ||
** Launch LiveUSB the Creator and follow the instructions [[SoaS_Blueberry_Instructions#For_Windows_Users|above]]. | ** Launch LiveUSB the Creator and follow the instructions [[SoaS_Blueberry_Instructions#For_Windows_Users|above]]. | ||
| − | * If you use any '''other distribution''', download the '''image-writer''' tool from [http://download.sugarlabs.org/soas/releases/image-writer here] and the live image from [http://download.sugarlabs.org/soas/releases/soas-2-blueberry.iso here]. Unfortunately, image-writer will not allow you to save your work; it does not create a | + | * If you use any '''other distribution''', download the '''image-writer''' tool from [http://download.sugarlabs.org/soas/releases/image-writer here] and the live image from [http://download.sugarlabs.org/soas/releases/soas-2-blueberry.iso here]. Unfortunately, image-writer will not allow you to save your work; it does not create a persistent storage overlay |
** Open a terminal and become root, either by using su or sudo. | ** Open a terminal and become root, either by using su or sudo. | ||
** Enter the following command: ''./image-writer soas-2-blueberry.iso'' | ** Enter the following command: ''./image-writer soas-2-blueberry.iso'' | ||
Revision as of 12:16, 7 December 2009
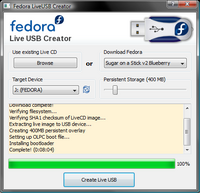
For Windows Users

- Download the latest version of the Fedora LiveUSB Creator from http://fedorahosted.org/liveusb-creator and extract it.
- Plug a blank target USB flash drive into your computer (minimum 1-gigabyte). WARNING: this procedure erases all data already on the flash drive! Copy any existing data elsewhere first.
- Launch LiveUSB Creator.
- Select Sugar on a Stick v2 Blueberry in the drop-down menu on the upper-right side.
- Adjust the Persistent Storage slider. This enables you to save your work in Sugar onto the device.
- Select your flash drive as the target and click the Create Live USB button.
- Wait for the process to finish, then close the LiveUSB Creator program.
- Stop your flash drive using the Safely Remove Hardware dialog and eject it.
For GNU/Linux Users
Linux Users will use a slightly different approach than Windows Users to ensure maximum compatibility with different distributions. Please follow the instructions carefully to ensure your data is preserved.
- If you are a Fedora User, run the following command: yum install liveusb-creator
- Launch LiveUSB the Creator and follow the instructions above.
- If you use any other distribution, download the image-writer tool from here and the live image from here. Unfortunately, image-writer will not allow you to save your work; it does not create a persistent storage overlay
- Open a terminal and become root, either by using su or sudo.
- Enter the following command: ./image-writer soas-2-blueberry.iso
- WARNING: If you proceed here, your flash drive will be wiped!
- The script will output a device name; confirm that it matches with your flash drive.
- You will be notified once the process has finished.
- For a Persistent USB see this link:[1]
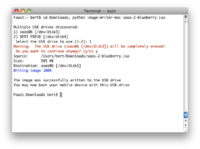
For Mac OS X Users
The procedure for Mac OS X users is similar to the one for Linux users. Verify that you have an Intel processor, and not a PowerPC (PPC) G3, G4, or G5 processor Apple Macintosh. Mac users should be aware that they may be able to prepare their flash drive on a Mac, but depending on the generation of the hardware used, they may need to use another computer to test whether the prepared flash drive works.

- Download the Sugar on a Stick v2 Blueberry live image from here: http://download.sugarlabs.org/soas/releases/soas-2-blueberry.iso
- Download the image-writer tool for Macs from here: http://download.sugarlabs.org/soas/releases/image-writer-mac
- Insert a flash drive. WARNING: your flash drive will be wiped in the next step!
- Execute the following command in Terminal: cd Downloads; python image-writer-mac soas-2-blueberry.iso
- Proceed as stated in the instructions for Linux Users.