Difference between revisions of "Tutorials/Installation/Import a VirtualBox appliance"
< Tutorials | Installation
Jump to navigation
Jump to search
m |
|||
| (One intermediate revision by the same user not shown) | |||
| Line 1: | Line 1: | ||
| + | <noinclude>[[Category:Tutorial|Import]]</noinclude> | ||
| − | + | <big>This tutorial will show how to import an appliance into VirtualBox.</big> | |
| − | :Here are some prebuilt [[ | + | |
| − | :This is a simple way to | + | : Here are some prebuilt [[Emulator image files|VirtualBox appliances]] that you can download and import. |
| − | ::Note: [ | + | : This is a simple way to run various versions of Sugar on your PC or Mac. |
| − | * | + | :: Note: [[VirtualBox]] is OS agnostic and runs the same appliance in Windows, GNU/Linux, and Mac operating systems. It must be installed on your system first. |
| + | * The appliance used in this example can be downloaded from here: [[Sugar_on_a_Stick/Pineapple/Virtual_machines|Sugar on a Stick v6 Pineapple Appliance]] | ||
===Importing=== | ===Importing=== | ||
| − | *Download the 2 files from | + | * Download the 2 files from the link above and '''click on the .ovf file'''. It will be imported into your VirtualBox installation. |
| − | + | : Or | |
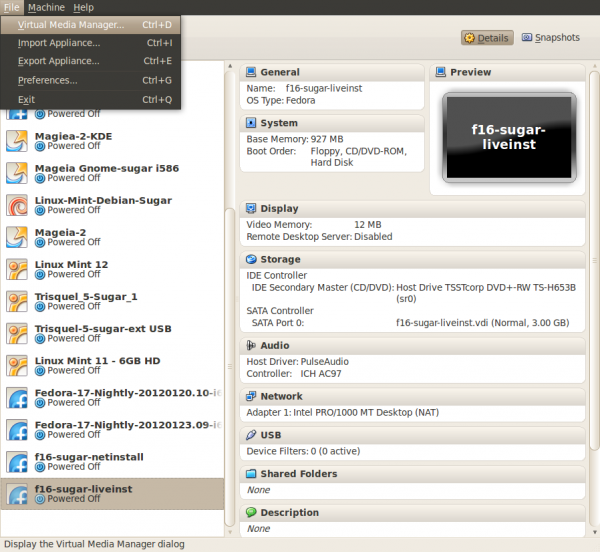
| − | *Select '''Import Appliance''' from the | + | * Select '''Import Appliance...''' from the File menu drop-down palette at the top of the VirtualBox console. |
[[File:1-Import.png|600px]] | [[File:1-Import.png|600px]] | ||
| − | *Import Appliance | + | |
| − | :Select the .ovf file | + | |
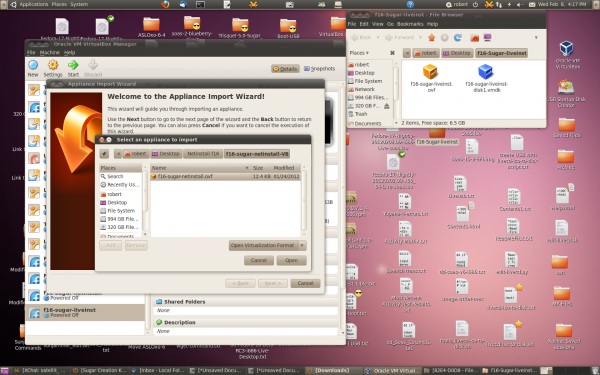
| + | * Import Appliance... | ||
| + | : Select the .ovf file | ||
[[File:2-selelect.png|600px]] | [[File:2-selelect.png|600px]] | ||
| − | *Adjust Import Settings | + | |
| − | :'''You can edit these items.''' | + | |
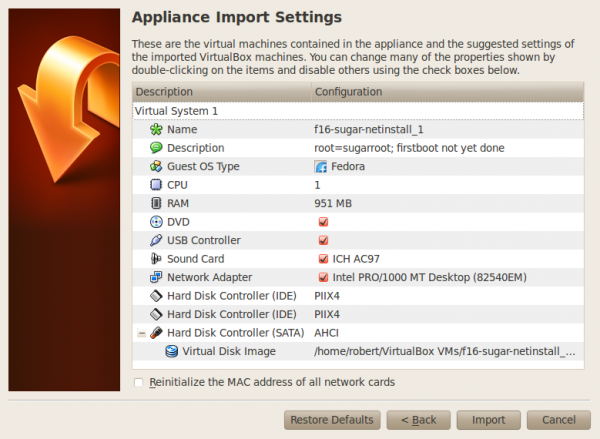
| + | * Adjust Import Settings | ||
| + | : '''You can edit these items.''' | ||
[[File:3-import.png|600px]] | [[File:3-import.png|600px]] | ||
| − | *Click (Import) | + | |
| − | * Agree to GPL license | + | |
| + | * Click (Import). | ||
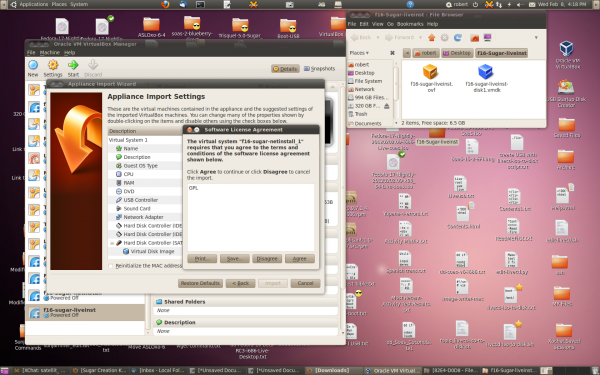
| + | * Agree to the GPL license. | ||
:If this was specified on setup of Export of this appliance | :If this was specified on setup of Export of this appliance | ||
[[File:4-GPL.png|600px]] | [[File:4-GPL.png|600px]] | ||
| − | *Importing | + | |
| + | |||
| + | * Importing | ||
[[File:5-importing.png|600px]] | [[File:5-importing.png|600px]] | ||
| − | *Now the imported appliance is loaded in VirtualBox | + | |
| − | :Click on ''' | + | |
| + | * Now the imported appliance is loaded in VirtualBox. | ||
| + | : Click on '''Settings''' | ||
[[File:8-new_appliance.png|600px]] | [[File:8-new_appliance.png|600px]] | ||
| − | *Add USB | + | |
| − | :Settings | + | |
| − | *Note | + | * Add USB |
| + | : Settings..USB | ||
| + | * '''Note:''' You have to have the [[VirtualBox|VirtualBox Extension pack]] installed for USB2 to work. | ||
[[File:6-Add_USB.png|600px]] | [[File:6-Add_USB.png|600px]] | ||
| − | *Adjust System settings | + | |
| − | :Settings | + | |
| + | * Adjust System settings | ||
| + | : Settings..System | ||
[[File:7-system.png|600px]] | [[File:7-system.png|600px]] | ||
| − | * | + | |
| − | :Click on ==> green arrow '''start''' | + | |
| − | :VirtualBox boots Sugar | + | * Click the (OK) button. |
| + | : Click on ==> green arrow '''start''' | ||
| + | : VirtualBox boots Sugar | ||
[[File:8-new_appliance.png|600px]] | [[File:8-new_appliance.png|600px]] | ||
| − | *VirtualBox completes the boot and goes to | + | |
| − | :Fedora FirstBoot (registration and user/password selection) | + | |
| + | * VirtualBox completes the boot and goes to | ||
| + | : Fedora FirstBoot (registration and user/password selection). | ||
[[File:10-firstboot.png|600px]] | [[File:10-firstboot.png|600px]] | ||
| − | *Then goes to this screen | + | |
| + | |||
| + | * Then goes to this screen, | ||
: gdm Login of User (in this case sugar) | : gdm Login of User (in this case sugar) | ||
[[File:11-login-gdm.png|600px]] | [[File:11-login-gdm.png|600px]] | ||
| − | *'''Congratulations you are now running Sugar v6 Pineapple''' | + | * '''Congratulations, you are now running Sugar on a Stick v6 Pineapple''' |
Latest revision as of 17:21, 6 July 2012
This tutorial will show how to import an appliance into VirtualBox.
- Here are some prebuilt VirtualBox appliances that you can download and import.
- This is a simple way to run various versions of Sugar on your PC or Mac.
- Note: VirtualBox is OS agnostic and runs the same appliance in Windows, GNU/Linux, and Mac operating systems. It must be installed on your system first.
- The appliance used in this example can be downloaded from here: Sugar on a Stick v6 Pineapple Appliance
Importing
- Download the 2 files from the link above and click on the .ovf file. It will be imported into your VirtualBox installation.
- Or
- Select Import Appliance... from the File menu drop-down palette at the top of the VirtualBox console.
- Import Appliance...
- Select the .ovf file
- Adjust Import Settings
- You can edit these items.
- Click (Import).
- Agree to the GPL license.
- If this was specified on setup of Export of this appliance
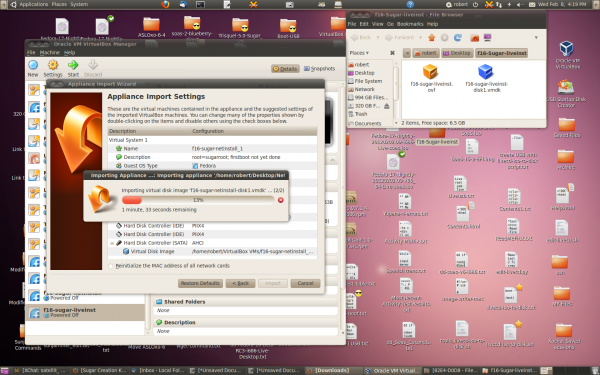
- Importing
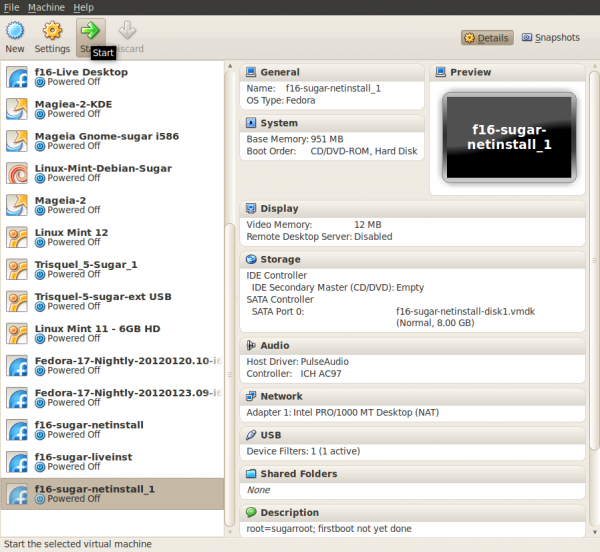
- Now the imported appliance is loaded in VirtualBox.
- Click on Settings
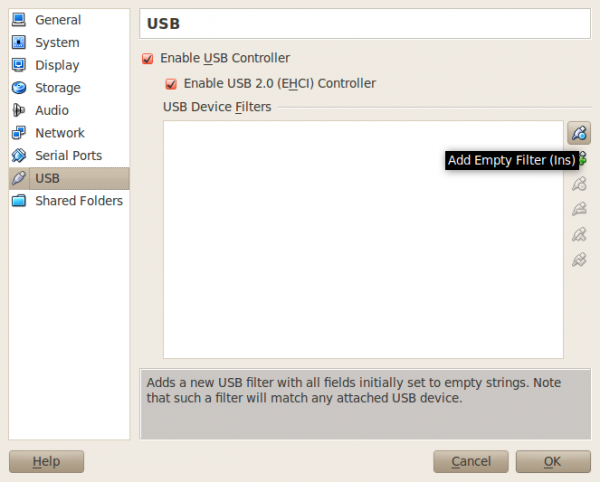
- Add USB
- Settings..USB
- Note: You have to have the VirtualBox Extension pack installed for USB2 to work.
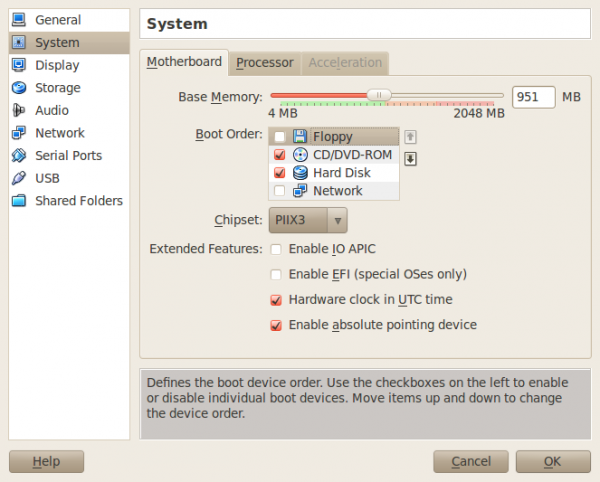
- Adjust System settings
- Settings..System
- Click the (OK) button.
- Click on ==> green arrow start
- VirtualBox boots Sugar
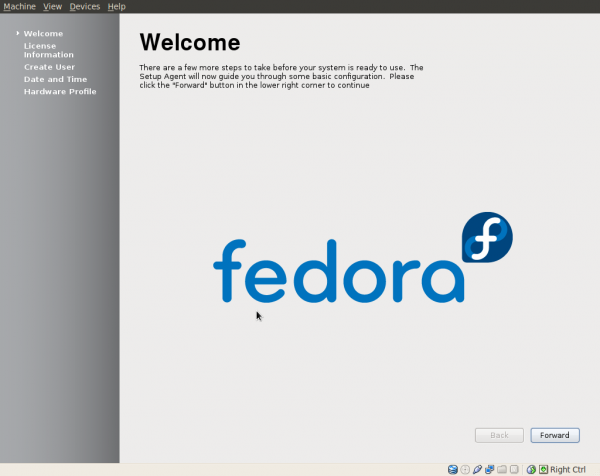
- VirtualBox completes the boot and goes to
- Fedora FirstBoot (registration and user/password selection).
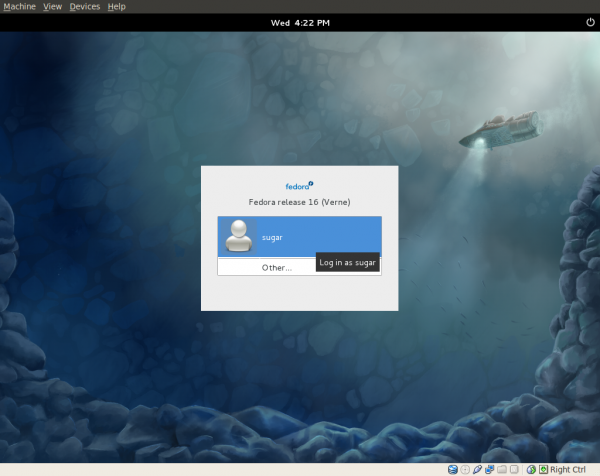
- Then goes to this screen,
- gdm Login of User (in this case sugar)
- Congratulations, you are now running Sugar on a Stick v6 Pineapple
