Activities/Turtle Art
What is Turtle Art
Turtle Art is an activity with a Logo-inspired graphical "turtle" that draws colorful art based on snap-together visual programming elements.
Note: There are two inter-compatible programs: Turtle Art and Turtle Blocks. Turtle Art, which closely parallels the Java version of Turtle Art maintained by Brian Silverman, offers a small subset of the functionality of Turtle Blocks.
Where to get Turtle Art

Turtle Art is a Fructose module, so it is included as part of the standard Sugar (Sucrose = Glucose+Fructose) distribution.
Sugar Activity Library
Sources
Manuals & Guides
- Turtle Cards
- FLOSS Turtle Art manual
- Student Guide
- activity guides (es)
- mas TortugaArte
- ¿Qué es Logo?
- 84 Ejercicios de Geometría
- Logo Progress Report 1973-1975
- http://www.mochiladigitaltelmex.com.mx/pdf/xo/TortugArte.pdf
Galleries
- Python Turtle Art Gallery
- Java Turtle Art Gallery
- Another Turtle Art gallery
- (archivo en PowerPoint)
Blogs
- 40 shapes challenge
- Caacupé
- Club ¡Formando Artistas con la Tortuga!
- Capacitacion y seguimiento de Formadores para el acceso a la XO!!
- Flags of Paraguay
- student blog
Other wiki pages
Release notes
Video
Bugs
i18n
Turtle Art currently has support for: de, el, en, es, fa_AF, fi, fr, hi, it, mn, nl, ps, pt, ru, sl, sv, ta, tr, vi, and zh_TW
(See our Pootle server for details about how to translate Turtle Art into your language.)
Reporting bugs
Please file bug reports here.
Background
Turtle Art is intended to be a stepping stone to the Logo programming language, but there are many restrictions compared to Logo. (Only numeric global variables and stack items are available, no lists or other data-structures. The conditionals and some of the functions only take constants or variables, not expressions. Limited screen real-estate makes building large programs unfeasible.) However, you can export your Turtle Art creations to Berkeley Logo.
Turtle Art was written by Brian Silverman and is maintained by Walter Bender. Arjun Sarwal added the sensor features. Luis Michelena contributed to the "named" action and box blocks. Tony Forster has been the lead test engineer and has really stretched the boundaries of Turtle Art. Raúl Gutiérrez Segalés has been a major contributor to the refactoring of the Turtle Art code base starting with Version 0.83.
Galleries
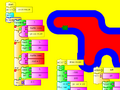
Play with Turtle Art to draw colorful art patterns using a turtle that accepts instructions for movement.
With visual programming blocks, you can snap together programs by compiling (combining) them in ways to create anything you can imagine.


Graphics

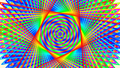
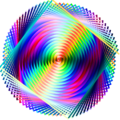
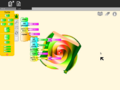
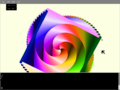
color-wheel swirl (jboisture)
David's design (David Morris)
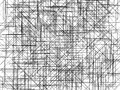
triangulation (Colette)
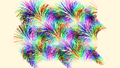
fireworks (jboisture)
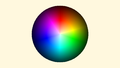
color wheel with shade (jboisture)

color wheel riff (jboisture)


Media
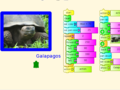
my elder cousin
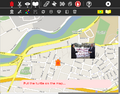
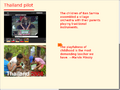
putting images on a map


Maths
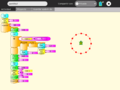
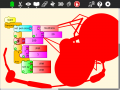
Calculating the hypotenuse and approximating the angle of a right triangle
Stepping through the program is a nice way to visualize the process of approximation
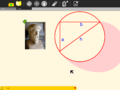
The final result of the approximation. Pythagoras
And on-the-fly function definitions
Currency (using File:US-currency.tar.gz)
Currency including coins (using File:Oz-currency.tar.gz)
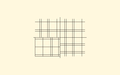
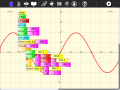
graph paper (jelkner)
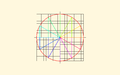
unit circle (jboisture)


A clock activity
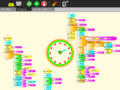


Tony Forster describes his "adventures" with on-the-fly definitions to create an analog clock in his blog.
Try any of the time or math library functions, e.g.,
localtime().tm_min
sin(x) + sin(pi/2)
Sensors
Turtle Art supports sensor input:
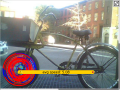
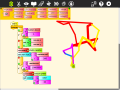
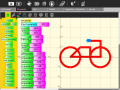
Using a Hall-effect sensor, you can build a bike odometer in Turtle Art
sound paint Capturing mouse events and using audio to set the pen width
Reading data from multiple sensors (XO hardware only)
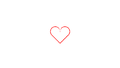
love speaks volumes A heart that beats according to sensor input


More ideas for sensors [[2]] [[3]]
Games
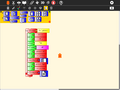
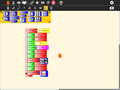
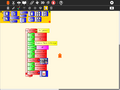
Turtle Art can be used to write games, such as a simple falling block game:
Space invaders


Presentations


Student work
Students from Caacupé have been sending me examples of their work:
Eduado Fabian Ayala Vargas

Johana Soeli Aquino
Ivan Silva
Rodrigo Nicolas Valdéz Bobadilla
Juan Pablo Espinola Carballo
Miguela


Just for fun
Q: How do I cast keyboard input to a string? A: Use chr().


Turtle Art Day 2013
More features
Cartesian and polar coordinate grids
Collapsible stack
Collapsed stack
Python function with one, two, or three variables
Expandable bullet list (two bullets)
Expandable bullet list (four bullets)
Enlarged blocks

Shrunken blocks
SVG output using the save SVG block
Multi-variable Python blocks
Turtle 'sees'


Getting Started

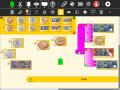
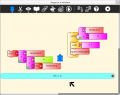
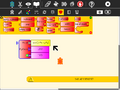
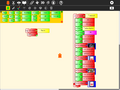
Start by clicking on (or dragging) blocks from the Turtle palette. Use multiple blocks to create drawings; as the turtle moves under your control, colorful lines are drawn.
You add blocks to your program by clicking on or dragging them from the palette to the main area. You can delete a block by dragging it back onto the palette. Click anywhere on a "stack" of blocks to start executing that stack or by clicking in the Rabbit (fast) or Turtle (slow) buttons on the Project Toolbar.
basic turtle graphics: 'forward', 'back', 'arc', and 'right' blocks

'show' block used for text
multimedia: 'show' block used for image (movies, audio)
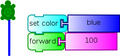
pen attributes: 'set pen color' block
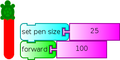
'set pen size' block
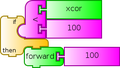
logical operations: 'if' block
named variables:'store in' block


Video Tutorials
I know there are a few but they are not categorized on this page... we'll make that happen soon. Help would be appreciated.
- introductory videos here on Turtle Art
- To Square—a tutorial by the Summer Spot youths at the Lilla G. Frederick Pilot Middle School
- A basic tutorial.
- a video of the portfolio basics
- Get your hot cold Turtle Art Video here!
- Name that State!
- A Shapes and Colors Game
Toolbars
Main Toolbar
![]()
From left to right:
- Activity toolbar (includes sharing; saving/loading options);
- Edit toolbar (including copy and paste);
- View toolbar (including full-screen, coordinate overlays; turtle status, etc.);
- Palette toolbar (including all programming blocks);
- erase canvas;
- run project fast (rabbit);
- run project slow (snail);
- hide blocks (This button is replaced by the stop button when the project is running);
- help;
- load examples;
- stop activity
- Note
- Keyboard short cuts for the above: Alt+ palette; blocks; run; walk; stop; erase; e.g., Alt+e will erase the screen. Esc will return from full-screen mode.
- Note
- The run buttons are tied to the Start Block. If no Start Block is used, then all blocks are run when either run button is clicked.
- Note
- The "rabbit" button runs the blocks at maximum speed. The "snail" button pauses and displays the turtle and block values between each step.
- Note
- The
 button, which is replaced by the Stop button on the main toolbar while the program is executing, is used to reveal the program blocks. Individual palettes can be hidden by clicking on their highlighted tab.

- Note
- On older versions of Sugar (e.g., 0.84), the main toolbar will look like this:

Project Toolbar

From left to right:
- Project title;
- Write to Journal (on newer versions of Sugar)
- Keep button (not shown; only appears on older Sugar systems)
- Share button;
- Share blocks button used to share stacks of blocks between collaborators (shown in inactive state);
- Save palette button (shows save options; see below);
- Load palette button (shows load options; see below)
- Note
- On older Sugar systems, these controls appear on the Import/Export toolbar.
- Note
- To share a stack, click on the share button. The cursor will change to the hand shape
 . Place the cursor on any block or stack of blocks and click. The blocks will be shared and the cursor will change back to the arrow shape.


Edit Toolbar

The Edit toolbar is used to copy stacks of blocks to the clipboard and to paste stacks from the clipboard. To copy a stack, click on the copy button or type Ctrl-c. The cursor will change to the hand shape ![]() . Place the cursor on any block or stack of blocks and click. The blocks will be copied to the Sugar clipboard and the cursor will change back to the arrow shape. To paste from the clipboard, type Ctrl-v or click the paste button.
. Place the cursor on any block or stack of blocks and click. The blocks will be copied to the Sugar clipboard and the cursor will change back to the arrow shape. To paste from the clipboard, type Ctrl-v or click the paste button.
From left to right:
- Copy;
- Paste;
- Undo (Restore blocks from trash);
- Save stack to custom palette (use the hand cursor to select a stack to save, the stack of blocks must start with an "action" block);
- Remove stack from custom palette (use the hand cursor to select a stack on the custom palette to delete)
- Note
- After save stack: To show the custom palette or see new stacks it is necessary to restart TurtleBlocks
View Toolbar

From left to right:
- Full-screen button;
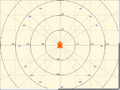
- Cartesian-coordinate grid;
- polar-coordinate grid;
- not shown: centimeter-coordinate grid (XO-only);
- Rescale-coordinates button (There are two modes: one pixel-based and one scaled from -20 to 20);
- Grow block size;
- Shrink block size
- Disable/enable hover help
- display of x,y coordinates, heading of turtle;
Palettes Toolbar
The palette menus are revealed by clicking on the Block icon on the main toolbar. (On older Sugar systems, select the Projects toolbar. When running Turtle Art from GNOME, the palettes are visible by default.)

There are ten palettes of program elements available for program construction: Turtle movements; Pen attributes; Color attributes; Numeric operators; Logical operators; Logical blocks; Sensor blocks; Media blocks; Customization functions; and Presentation blocks. An eleventh palette is used for restoring blocks from the trash.
- Note
- Additional palettes may be loaded by plugin extensions to Turtle Blocks.
- Note
- A custom palette is created if you use the 'save stack' button on the Edit toolbar.
- Note
- Blocks are dragged from the palette onto the canvas surface. To dispose of a block, drag it back onto the palette. (It will be placed onto the trash palette.)
- Note
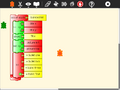
- The palettes can be displayed horizontally or vertically (See below). Orientation is adjusted by clicking on the
 and
and  buttons on the upper-left corner of the palette.
- Note
- The palette can be hidden by clicking on the
 button on the lower-right corner of the palette.
- Note
- The next palette in the menu can be accessed by clicking on the
 button on the upper-right corner of the palette.
- Note
- On smaller screens, a palette may not fit. It can be scrolled by clicking on the
 button.
Turtle Palette

These blocks are used to control the movements of the turtle.
- forward: move turtle forward
- back: move turtle backward
- clean: clear the screen and position the turtle in the center of the screen, pen down, color red, heading 0
- left: rotate turtle counterclockwise
- right: rotate turtle clockwise
- arc: move turtle along an arc
- set xy: set turtle x,y position (0,0) is the center of the screen
- seth: set turtle heading
- xcor: holds current x-coordinate value of the turtle (can be used in place of a number block)
- ycor: holds current y-coordinate value of the turtle (can be used in place of a number block)
- heading: holds current heading value of the turtle (can be used in place of a number block)
Pen Palette

These blocks are used to control the attributes of the turtle's pen.
- pen up: turtle will not draw when moved
- pen down: turtle will draw when moved
- set pen size: sets the width of the line drawn by the turtle
- fill screen: fill the screen with a color/shade and reposition the turtle in the center of the screen
- pen size: width of the line drawn by the turtle (can be used in place of a number block)
- set color: sets the pen color
- set shade: sets the pen shade
- set gray: sets the gray-level of the pen (Only available in Turtle Blocks)
- color: current pen color (can be used in place of a number block)
- shade: current pen shade (can be used in place of a number block)
- gray: current pen gray level (can be used in place of a number block) (Only available in Turtle Blocks)
- start fill: starts a filled polygon (straight sides, not arcs)
- end fill: ends a fill polygon (straight sides, not arcs)
Color Palette

These blocks can be used with the set-pen-color block in place of a number block.
Numbers Palette

These blocks are arithmetic and boolean operators.
- addition: adds two numeric inputs (also can be used to concatenate strings)
- subtraction: subtracts the bottom numeric input from the top input
- multiplication: multiplies two numeric inputs
- division: divided top input (numerator) by bottom input (denominator)
- identity: identity function (used for spacing blocks)
- modulo (remainder): calculates remainder when dividing top input by the bottom input
- square root (Only available with Turtle Blocks)
- random number: generates a random integer between the minimum and maximum values
- number block: a numeric input
- greater than: boolean greater than operator (used with flow blocks)
- less than: boolean less than operator (used with flow blocks)
- equal to: boolean equal to operator (used with flow blocks)
- not: boolean not (Only available with Turtle Blocks)
- and: boolean and (Only available with Turtle Blocks)
- or: boolean or (Only available with Turtle Blocks)
Flow Palette

These blocks control program flow.
- wait: pause program execution (unit is seconds)
- forever: continuously repeat execute stack under the right flow
- repeat: repeat the execution of stack under the right flow a specified number of times
- if/then: conditional execution of the stack under the right flow (uses boolean operators found on the Number palette)
- if/then/else: conditional execution of the stack under the center and right flows (uses boolean operators found on the Number palette)
- vertical spacer
- stop stack: interrupt execution
- while: execute stack under right flow while the condition is true (uses boolean operators found on the Number palette) (Only available with Turtle Blocks)
- until: execute stack under right flow until the condition is true (uses boolean operators found on the Number palette) (Only available with Turtle Blocks)
Note: Nesting while and/or until blocks is not always reliable. If you encounter an error, try putting the nested block in a separate stack, accessed with an action block.
Blocks Palette

These blocks are for defining variables and subroutines. Without actions
- start: connects action to toolbar 'Run' button
- store in: store a number, string, or media object in a named box
- action: top of named action stack
- action: execute named action stack
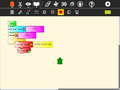
Note: When a named action or named box block are used, new blocks appear on the palette that correspond to these names; e.g., if a top of action stack is rename, "to square", an action block, "to square" is added to the palette.

Palette with additional actions and boxes created by the user.
Sensors Palette

- query keyboard: check for keyboard input (results are stored in the keyboard block)
- keyboard: current value of keyboard input (can be used in place of a number block)
- read pixel: push the RGB value of the pixel under the turtle onto the FILO (blue is first, red is last)
- turtle sees: the "palette color" of the pixel under the turtle
- time: number of seconds since program began
- sound: raw data from microphone ranging -32000 to 32000
- volume (loudness): ranging 0 to 32000
- pitch: the resolution is +-8Hz
- brightness: average luminance seen through camera
- button down: current state of the mouse button (1 == down; 0 == ip)
- mouse x: x position of mouse
- mouse y: y position of mouse
The OLPC XO can measure external inputs with its microphone jack:
- resistance: measurement range is 750 to 14k ohms, (OLPC XO1) and 2k ohms to open circuit (OLPC XO1.5)
- voltage: measurement range is DC 0.4V to 1.85V. (OLPC XO1) and 0.17V to 3.0V (OLPC XO1.5)
The OLPC XO 1.75 also includes an accelerometer.
- accelerate (not shown): measure the acceleration of the computer. Results are pushed to the stack and can be retrieved by using 3 'pop' blocks (one for X (horizontal), one for Y (vertical), and one for Z (forward/backward))
See Activities/Turtle Art/Using Turtle Art Sensors for more details about the sensor blocks.
(Activities/Turtle Art/Uso de Tortuga Arte Sensores español)
Media Palette

These are a collection of blocks used for displaying media objects, such as images from the Journal.
- journal: Sugar Journal media object (used with show block) (also available in Turtle Art)
- audio: Sugar Journal media object (used with show block)
- video: Sugar Journal media object (used with show block)
- description: Sugar Journal description field (used with show block)
- text: text string (used with show block; also used with box and action blocks)
- show: draw text or display media object from the Journal
- set scale: sets the scale of images displayed with show block
- save picture: save the canvas to the Sugar Journal as a .png image (note: saves the canvas as displayed)
- save SVG: save turtle graphics to the Sugar Journal as a .svg image (note: only saves the changes to the canvas in the current execution run)
- scale: sets scale for show block (100% is full-screen)
- media wait: used to pause program while audio or video file plays
- media stop: stop current sound or video
- media pause: pause current sound or video
- media resume: resume playing paused media
- speak: sends text to the voice synthesizer
- sine wave: plays a sine wave of a given frequency, amplitude, and duration
Extras Palette

These are a collection of extra blocks for accessing advanced features only available in Turtle Blocks.
- push: push value onto FILO (first-in last-out) heap
- show heap: show FILO in status block
- empty heap: empty the FILO
- pop: pop value off of the FILO (can be used in place of a number block)
- print: print value in status block (also available in Turtle Art)
- comment: program comment (displayed in "walk" mode)
- chr: Python chr primitive: converts ASCII to character (useful for converting keyboard input to text)
- int: Python int primitive: converts input to integers
- Python: a programmable block (can be used in place of a number block)
- add your own math equation in the block, e.g., sin(x); This block is expandable to support up to three variables, e.g. f(x,y,z)
- Import Python: import Python code from the Sugar Journal (a more general-purpose programmable block). This block accepts a single variable x, as an input or up to 3 variables as an array x[0], x[1] and x[2]
- Cartesian: display Cartesian coordinate grid overlay
- polar: display polar coordinate grid overlay
- turtle: specify which turtle is active
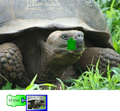
- turtle shell: import a image from the Journal to use as the turtle's 'shell', i.e., replace the turtle with a sprite.
- turtle x: Return x coordinates of turtle
- turtle y: Return y coordinates of turtle
- active turtle: the name of active turtle
- turtle heading: Return heading of turtle
- URL: gets a text string or image from a URL
Portfolio Palette

These blocks are used to make multimedia presentations only available in Turtle Blocks.
- hide blocks: hides all blocks and palettes (useful for decluttering the screen during presentations) (also available in Turtle Art)
- show blocks: shows blocks and palettes (useful for resuming programming after a presentation)
- full screen: goes into full-screen mode (hides Sugar toolbars)
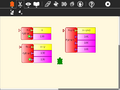
- list slide: used for bulleted lists; This block is expandable, allowing you to add as many bullets as you need
- picture slides: used for picture slides (1×1, 2×2, 1×2, and 2×1)
Only available in Turtle Blocks:
- left: holds current x-coordinate value of the left edge of the screen (can be used in place of a number block)
- top: holds current y-coordinate value of the top edge of the screen (can be used in place of a number block)
- right: holds current x-coordinate value of the right edge of the screen (can be used in place of a number block)
- bottom: holds current y-coordinate value of the bottom edge of the screen (can be used in place of a number block)
- width: screen width (can be used in place of a number block)
- height: screen height (can be used in place of a number block)
- Note: The slide blocks expand into stacks that can be edited for customized presentations.
User custom-stack palette

The custom palette holds any blocks that have been saved with "Save Stack" option in Edit Toolbar. It lets you reuse stacks between projects. Blocks on this palette will expand into action stacks.
- Note
- This palette first appears after using the "Save stack" option on the Edit Toolbar.
Trash Palette

This palette holds any blocks that have been put in the trash. You can drag blocks out of the trash to restore them. The trash palette is emptied when you quit Turtle Art.
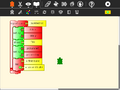
Vertical palettes
An example of a vertical palette. Vertical palettes are used by default on the OLPC XO laptops running older versions of Sugar.
Palettes en español
Extras
Keyboard shortcuts
- Ctrl+q quit (exit Turtle Art)
- Alt+p show/hide the palettes
- Alt+b show/hide the blocks
- Alt+r run the 'start' stack rapidly
- Alt+w run the 'start' stack slowly (and highlight blocks during execution)
- Alt+s stop execution of the stack
- Alt+e erase the screen
- Esc return from full-screen mode
- Ctrl+c copy a stack of blocks or text from a block
- Ctrl+v paste a stack of blocks or text into a block
- cursor (arrow) keys (or h j k l keys) move selected stack of blocks or turtle or move between toolbar items
- Return (Enter) is used to run a stack of blocks or to select a toolbar item
- space selects the next block (in the order in which they were added) (only in version 100+)
Note for OLPC-XO laptop users: the buttons on the display can also be used.
- The left-hand buttons can be used to move a stack of blocks or turtle
- o button runs the selected stack of blocks or returns the selected turtle to the home position (center of the screen)
- × button deletes the selected stack of blocks
- ✓ button runs the 'start' stack
- ◽ button selects the next block (in the order in which they were added) (only in version 100+)
Copying and Pasting
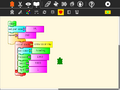
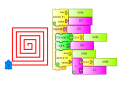
Did you know that you can copy/paste stacks to/from the clipboard? You type Ctrl-C to copy whatever stack is under the cursor to the clipboard. Ctrl-V will paste from the clipboard onto whatever TA project you have open. Try pasting this code into your Turtle Art project.
[[0, "clean", 258, 217, [12, 1]],
 [1, "repeat", 258, 251, [0, 2, 3, null]],
 [2, ["number", 36], 309, 251, [1, null]],
 [3, "repeat", 323, 311, [1, 4, 5, 9]],
 [4,  ["number", 4], 374, 311, [3, null]],
 [5, "forward", 388, 371, [3, 6, 7]],
 [6, ["number", 300], 459, 371, [5, null]],
 [7, "right", 388, 413, [5, 8, null]],
 [8, ["number", 90], 446, 413, [7, null]],
 [9, ["vspace", 20], 323, 389, [3, 10]],
 [10, "right", 323, 463, [9, 11, null]],
 [11, ["number", 10], 381, 463, [10, null]],
 [12, "start", 258, 175, [null, 0]]]
You can also paste text from the clipboard into text blocks.
Note: You can duplicate individual blocks with copy and paste, when duplicating a text block, deselect the text block after copying if you want to duplicate the block rather than duplicating the text within the block.
Speed
Turtle Art has three 'run' buttons:
- The 'rabbit' button will run your program at full screen. Note: It will highlight blocks during execution, so your program will run much faster if you hide blocks.
- The 'turtle' button will run your program with a slight delay between blocks. Block are highlighted as they are executed and block labels are updated with the current block values.
- The 'debug' button will run your program with a longer delay between blocks. Block are highlighted as they are executed and block labels are updated with the current block values.
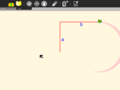
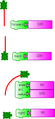
Sharing
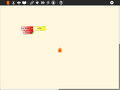
Turtle Art supports a simple sharing model. Whomever joins a shared activity will share turtles with the other participants, e.g., whatever any turtle draws will appear on every screen. While sharing, you can also send stacks of blocks from one user to another. Share can consume a lot of network bandwidth, so it is not recommended to share among more than 2–3 people at a time if the screen is frequently changing. As with all Sugar activities, you can use the Share-with feature of the Journal to share your Turtle Art projects with others.
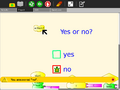
A simple application of Turle Art sharing is multimedia chat. Send text using the Show Block; voice using the Speak Block; and images using the Show Block. Lots of fun.
Note: Turtle Art will also share between Sugar and GNOME.
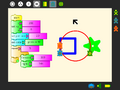
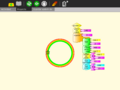
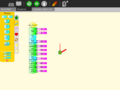
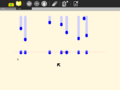
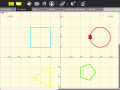
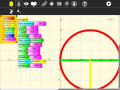
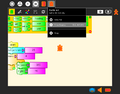
This (yellow) turtle drew a green star.
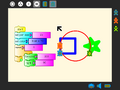
This (blue) turtle drew a blue square.
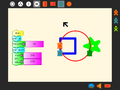
This (red) turtle drew a red circle.
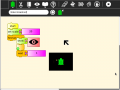
A simple script to broadcast video by sharing.


Running Turtle Art outside of Sugar

Turtle Art can be run in the GNOME desktop outside of Sugar.
PC HARDWARE:
- Download Turtle Art (as a *.xo archive)
- Extract the TurtleArt.activity directory from the archive, eg drag it to the desktop
- Open directory TurtleArt.activity
- Run turtleart.py (run in terminal is better, you can see error messages there)
OLPC XO HARDWARE
- The XO1.5 and later software builds for the XO1.0 allow switching between Gnome and Sugar desktops. The following assumes that Turtle Art is already installed in Sugar.
- Switch to the Gnome desktop
- open olpc's home on the desktop
- open Activities
- on later software builds, Activities is both hidden and locked, if so, check show hidden files to unhide, in terminal chmod 777 Activities to unlock
- open TurtleArt.activity
- run turtleblocks.py (run in terminal is better, you can see error messages there)
COMMAND LINE SWITCHES
turtleblocks --help
	turtleblocks.py
	turtleblocks.py project.tb
	turtleblocks.py --output_png project.tb
	turtleblocks.py -o project
	turtleblocks.py --run project.tb
	turtleblocks.py -r project
Presentations and Portfolios
A portfolio feature lets you use Turtle Art to create multimedia slide shows from material retrieved from your Journal. The basic idea is to import images (and eventually movies, audio, and text files) into slide templates, not unlike Powerpoint, and then show a presentation by stepping through them. The portfolio includes the typical major functions of presentation software: an editor that allows text to be inserted and formatted (this is largely incomplete), a method for inserting images (from the Journal), and a slide-show system to display the content. What makes it a bit different than tools such as Powerpoint is that you can program your slides using Turtle Art blocks. Turtle Art also has an export-to-HTML function so that presentations can be viewed outside of the Sugar environment. (These features have been merged into the main branch of Turtle Art.)
Background
In the era of high-stakes testing, we have the means to measure “which child knows more”; these data tell us about relative merit of the school in which a child is enrolled. The Turtle Art portfolio feature is an assessment tool that shows “what a child knows”; children become the curators of their own work. They advance their own learning and help their teachers, parents, and school administrators understand better the depth and breadth of what they have learned.
A recent article in the Chronicle of Higher Education claims:
- ePortfolios can integrate student learning in an expanded range of media, literacies, and viable intellectual work;
- ePortfolios enable students to link together diverse parts of their learning including the formal and informal curriculum;
- ePortfolios engage students with their learning;
- ePortfolios offer colleges a meaningful mechanism for accessing and organizing the evidence of student learning.
Turtle Art portfolios engage children in the process of reflecting on their work—what they have done, how they have done it, and how success these efforts have been—as they create a multimedia narrative to show their teachers, parents and peers what they have learned. Turtle Art Portfolio builds upon the journaling functionality of the Sugar learning platform, where every action or activity a child takes in the classroom is automatically recorded in a folder: (1) by enabling the child to select important learning achievements, be they in reading, writing, arithmetic, arts, music, physical education, history and social science, etc. Children answer questions such as “I chose this piece because...” (2) creating a multimedia narrative presentation from their selections (including audio voice-overs and video), reflective of the multiple ways in which children learn; and (3) sharing their presentation with classmates, both to celebrate what they have learned, but also to engage in a critical dialog about their work.
Turtle Art portfolio is innovative in three ways: (1) it builds upon a journal of *all* learning activities that is automatically collected; (2) it has unique programmability, fun and accessible to even the youngest elementary school children, but interesting and engaging to middle-school children as well; and (3) it has unique tools for both collaborating on the construction of the portfolio and its subsequent sharing with others.
Portfolios have been shown to be “a powerful means for children to assess their own work, set goals, and take responsibility for their future learning.” But portfolio assessment has seen limited applicability. It is a practical, engaging means to using portfolios. By building upon the automatic accumulation of work in journal (including a “screen capture” of their work) the portfolio process can readily be integrated into the classroom routine. Reflection becomes the norm: children are encouraged write in their journals (young children record audio notes) for a few minutes after *every* class. The numbing question, “what did you do in school today?” need no longer a necessary part of the parent-child dialog. Instead, the parent can talk to the child about actual artifacts.
Culling from the journal becomes part of the end-of-term assessment process. The process of telling one's story as a learning requires further reflection. At a “portfolio social”, parents are invited to view presentations and ask children about their learning; the child's voice is heard.
The classroom teacher can add addition assessment slides to the portfolio about themes such as work habits and personal growth, as part of an archive that travels with a child across grade levels. Through juxtaposition, the child and teacher can see what has changed over the course of the years, trends, and areas for improvement, Also, a classroom portfolio can be assembled as part of a teacher-assessment process.
Some additional background on ePortfolios can be found here:
- Inter/National Coalition for ePortfolio Research
- ePortfolio Action & Communication – ePAC
- Helen Barrett’s ePortfolio site
- Handbook of Research on ePortfolios
- EuroPortfolio
- Making Connections National Resource Center
Sharing a presentation
From version 106, pen trails, fill, show text and show images are shared with other laptops in a shared session. Screen erase is not shared. A slideshow can be broadcast to other laptops. Its simple, just these 2 blocks are required to broadcast a slide to all the laptops in the shared session.
![]()
Use set scale to set image size. Full screen images take longer than smaller images. See below for using the keyboard to advance slides and other presentation ideas.
Quick Tutorial on using the portfolio features
Start by selecting a slide template from the palette. The templates will automatically expand into a stack.
Click on the Journal icon to initiate a search for slide content.
Select a journal object, such as an image, audio file, movie, or activity. A thumbnail will appear in the template.
The description field for the Journal object will automatically be loaded.
Once loaded, the slide stack can be labeled and collapsed.
Click on the slide template to view the slide. (Click on the Hide Blocks button on the View toolbar to hide any blocks that are covering your slide.)
Try using some of the other templates.
View them by clicking on them (you may want to use the Eraser button first).
You can program a simple slide show by making a stack: fullscreen; hide blocks; clear the screen; show Slide 1; wait; clear the screen; show Slide 2; wait; show blocks.
You can also program stacks for your slide decorations and slide transitions.

In this example, we draw a rule under the title of each slide.
Run your slide show by clicking on the Run Button on the Main toolbar.
In this example, we use keyboard input to transition between slides.
Using the f and b keys to advance or go back slides.


A video of the portfolio basics is available here.
A PDF of a Turtle Art portfolio presentation can be downloaded File:Desktop-Summit.pdf.
Exporting to Berkeley Logo
Turtle Art can export its projects to Berkeley Logo (using either View Source or the Save as Logo button on the Project Toolbar) You can download the Berkeley Logo activity here.
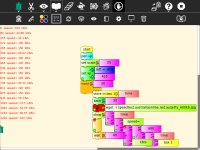
A Turtle Art project
The UCB Logo version (see "Internals" below)

Logo code generated from your project is viewable in the View Source panel in some versions of Turtle Art, but as of v100, the Turtle Art project itself is shown instead.
Turtle Art code
View Source menu
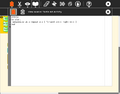
Logo code


Note: The Save-as-Logo button saves to the Journal as "logosession.lg". UCB Logo does not yet access the Journal directly, so it is necessary to copy the project out of the Journal using the "copy-from-journal" command in the Terminal Activity and then accessing the project using the File menu within the UCB Logo Activity.
copy-from-journal logosession.lg
Alternatively, you can open the logosession in 'Write', copy the Logo code to the clipboard, and then paste it into the UCB Logo Activity.
Internals, how a Turtle Art project is converted to Logo
Shown here is the Logo code generated from the Turtle Art project shown above.
Firstly the Logo code contains procedures for setting up the palette and the shade functionality:
to tasetpalette :i :r :g :b :myshade
make "s ((:myshade - 50) / 50)
ifelse lessp :s 0 [
make "s (1 + (:s *0.8))
make "r (:r * :s)
make "g (:g * :s)
make "b (:b * :s)
] [
make "s (:s * 0.9)
make "r (:r + ((100-:r) * :s))
make "g (:g + ((100-:g) * :s))
make "b (:b + ((100-:b) * :s))
]
setpalette :i (list :r :g :b)
end
to rgb :myi :mycolors :myshade
make "myr first :mycolors
make "mycolors butfirst :mycolors
make "myg first :mycolors
make "mycolors butfirst :mycolors
make "myb first :mycolors
make "mycolors butfirst :mycolors
tasetpalette :myi :myr :myg :myb :myshade
output :mycolors
end
to processcolor :mycolors :myshade
if emptyp :mycolors [stop]
make "i :i + 1
processcolor (rgb :i :mycolors :myshade) :myshade
end
to tasetshade :shade
make "myshade modulo :shade 200
if greaterp :myshade 99 [make "myshade (199-:myshade)]
make "i 7
make "mycolors :colors
processcolor :mycolors :myshade
end
to tasetpencolor :c
make "color modulo round :c 100
setpencolor :color + 8
end
make "colors [
100 0 0 100 5 0 100 10 0 100 15 0 100 20 0 100 25 0 100 30 0 100 35 0 100 40 0 100 45 0
100 50 0 100 55 0 100 60 0 100 65 0 100 70 0 100 75 0 100 80 0 100 85 0 100 90 0 100 95 0
100 100 0 90 100 0 80 100 0 70 100 0 60 100 0 50 100 0 40 100 0 30 100 0 20 100 0 10 100 0
0 100 0 0 100 5 0 100 10 0 100 15 0 100 20 0 100 25 0 100 30 0 100 35 0 100 40 0 100 45
0 100 50 0 100 55 0 100 60 0 100 65 0 100 70 0 100 75 0 100 80 0 100 85 0 100 90 0 100 95
0 100 100 0 95 100 0 90 100 0 85 100 0 80 100 0 75 100 0 70 100 0 65 100 0 60 100 0 55 100
0 50 100 0 45 100 0 40 100 0 35 100 0 30 100 0 25 100 0 20 100 0 15 100 0 10 100 0 5 100
0 0 100 5 0 100 10 0 100 15 0 100 20 0 100 25 0 100 30 0 100 35 0 100 40 0 100 45 0 100
50 0 100 55 0 100 60 0 100 65 0 100 70 0 100 75 0 100 80 0 100 85 0 100 90 0 100 95 0 100
100 0 100 100 0 90 100 0 80 100 0 70 100 0 60 100 0 50 100 0 40 100 0 30 100 0 20 100 0 10]
make "shade 50
tasetshade :shade
to tasetbackground :color :shade
tasetshade :shade
setbackground :color + 8
end
Then the Logo code contains the project:
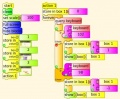
to ta
clearscreen tasetbackground 21 100 setpensize 25.0 make "box1 0.0
repeat 300.0 [ tasetpencolor xcor / 6.0 tasetshade heading forward :box1 right 91.0 make "box1 :box1 + 1.0 ]
end
ta
Activities/TurtleArt/ProgrammableBrick
Tutorials
General resources and guides
- http://www.ceibal.edu.uy/Userfiles/P0001/File/tortugarte_xo.pdf
- http://wiki.laptop.org/go/Recursos_en_espanol#TortugArte
- http://programajvglarioja.blogspot.com.ar/2012/07/tortugarte.html
- http://wiki.laptop.org/go/Activities/Argentina/LR/10.1.1
- http://www.perueduca.edu.pe/olpc/archivos/instructivos/14INSTRUCTIVO%20TORTUGARTfinal.pdf
- http://es.slideshare.net/hansbarrueto/tutorial-tortugarte
- http://maroaltave.wordpress.com/tortugarte/
- http://lists.laptop.org/pipermail/olpc-sur/2008-June/000175.html
- http://auladigete.blogspot.com.ar/2012/09/tortugarte-para-windows.html
- http://www.youtube.com/watch?v=GRA6DxfgQM4
- http://actividadesxo.blogspot.com.ar/2012/06/tortugarte.html
- http://milaptopxopuno.blogspot.com.ar/2012/06/blog-post_24.html
- http://www.veengle.com/s/tortugarte/9.html
- http://www.scribd.com/doc/112971527/afirstlesson-0001
- https://sites.google.com/site/solymar1fisica/fisica-con-xo-investigacion-/fisica-con-xo-el-libro
Turtle Art comes with many sample project. Below are additional examples created by community members.
Tutorial created at gci2012
Activities/TurtleArt/Tutorials/Turtle Art Tutorial gci2012
Activities/TurtleArt/Tutorials/Turtle Sensors Tutorial gci2012
Tony Forster's Blog
Tony Forster has written a number of blog posts about his experiments with Turtle Art:
- Using Python blocks in TurtleArt
- Turtle Lander
- Reprogramming Sugar
- Turtle random File:Turtle Blocks Activity random.ta (English & español)
- Turtle random V2 File:Turtle Blocks Activity randomv3.ta (English & español)
- Turtle Lissajous File:Turtle Art lisajous.ta (English & español)
- Turtle spring damper File:Turtle spring damper.ta (English & español)
- color and shade
- Turtle Art shapes
- Bouncing Turtle File:TurtleArt bounce.ta
- Turtle Pythagoras 1, 2
- Turtle graph File:Turtle graph.ta
- Turtle Pi File:Turtle pi.ta (English & español)
- Turtle Pi, another one File:Turtle Blocks pi another.ta (English & español)
- Turtle fractions File:TmpBtvKZX.ta (English & español)
- Turtle interactive multimedia
- capture numeric input File:Turtle Art getnumber.ta (English & español)
- Turtle eFile:Turtle e.ta (English & español)
- Turtle spirograph File:Turtle Art spirograph.ta (English & español)
- Mouse support File:Turtle Art Activity mouse.ta
- Turtle-sieve-of-Eratosthenes File:Turtle Art Activity eratos.ta (English & español)
- Turtle sliderule
- Turtle Diophantine File:Turtle Blocks Activity Diophantine.ta, see also (English & español)
- Turtle Paint File:Turtle Blocks Activity paint.doc
- Turtle Music Keyboard File:Turtle Art Activity keyboard.doc (English & español)
- Text to speech
- Talking clock File:Talking clock.ta
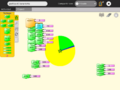
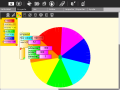
- Pie chart File:Turtle Art Activity pie chart.ta
- Singing turtle
- screen broadcast
- Maths, flip and rotate File:Flipandrotate.ta
- Maths, fractions and decimals File:Turtle Art Activity baloon0-1.ta Multiplication <100 File:Baloon100.ta Counting File:Count1-9.ta
- A simple die or spinner for probability File:Turtle Art Activity spinner.ta
- Division drill File:Turtle Art Activity division drill.ta
- Turtle calculus
- Turtle serial USB
- Graphing pitch and volume
- Orbital motion File:Turtle Art Activity orbital.ta
- Turtle spirit level for the XO-1.75 File:Turtle Art spirit level.ta
- Turtle seismograph File:Turtle Art Activity seismo.ta
- Colour addition File:Turtle Art rgb.ta
- Calculate a checksum File:Checksum.ta
- Internet download speedtest File:Turtle Art speedtest.ta File:Os.doc.odt
- Galton box File:Turtle Art Activity galton path.ta
- graphically display factors File:Turtle Art factors.ta

An bringing it all together, the Turtle Art Oscilloscope.
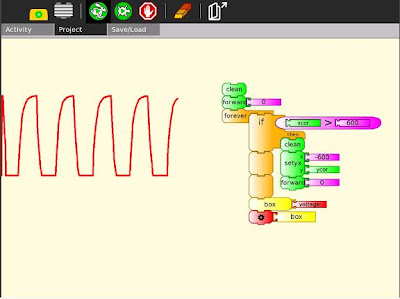
Tony has also used the programmable block to do file IO.
Video Tutorials
I know there are a few but they are not categorized on this page... we'll make that happen soon. Help would be appreciated.
- Physics on the XO using Turtle Art with Sensors
- To Square—a tutorial by the Summer Spot youths at the Lilla G. Frederick Pilot Middle School
- a video of the portfolio basics
- Get your hot cold Turtle Art Video here!
- Name that State!
- A Shapes and Colors Game
- A basic tutorial.
A list of further video clips can be found here.
Mokurai's Tutorials
Mokurai has been working on how to teach Sugar by guided discovery, rather than by explicit direction, with only the necessary minimum of hints. At the same time, he has been working on Turtle Art examples to teach concepts of mathematics, programming, Computer Science, and physics, aiming where possible at presentations suitable for pre-literate pre-schoolers. Thus, no text, no formulas, no calculations. Those can come later in sequences on the same topics as children develop, including a transition from Turtle Art to Python, Logo, and Smalltalk, with options for other languages. However, it is necessary to provide texts, sometimes with formulas and calculations, for the teacher or parent helping the child. These will appear on Mokurai's Replacing Textbooks blog, available at PlanetSugarlabs, and will be incorporated into Open Education Resources on the Sugar Labs Replacing Textbooks server.
Topics
- You be the Turtle
- Mathematics and art, an introduction to TA.
- Counting
- Adding apples and oranges
- Numerals
- Turtle Art programming without words (includes a link to Mayan and other visual numerals)
- Turtle Art and Logo
Planned topics
Primary school
- Kindergarten Calculus (tangents, maxima and minima, areas...)
- Complex Numbers
- Groups of symmetries
- Figurate numbers
- Spirograph
- Conservation of number
- Elementary arithmetic with whole numbers (but no numerals)
- Shortcuts to the times table
- Fractions with cake, pie, and pizza slices
- Algorithms of arithmetic
- Learning math by teaching the computer
- Knots and braids (and knitting, crocheting, macramé, tatting...)
- Galilean gravity
- Galilean relativity
- Measuring slopes of tangents
- Approximate integrals
- Python blocks
- Transition to Python
- Create your own Turtle Art add-ons in Python
- Turtle Graphics in Smalltalk
- Transition to Smalltalk
- Transition to Logo
- Frieze groups
- Moiré patterns and interference
- Tilings
- Topology (Rubber-sheet geometry)
- Juggling
- The square circle and other metrics
- Abacus, Chisanpeop (abacus on fingers), and visual numerals
- Infinite sequences and series
- Permutations and permutation groups
- The ring of clock time
- Vectors
- Venn diagrams
- Euclid, Book I: triangles, parallelograms, squares
- Spherical geometry (Riemann)
- Maps
- Iterated functions (attractors, chaos)
- Fractals
- Stack programming
- Parse trees
- Probability
- Combinatorics
- Models of simple molecules
Higher
At this level it is not necessary to use Turtle Art_to_introduce ideas. Nevertheless the ability to display a topic in Turtle Art demonstrates that it is of only a moderate level of complexity.
- Trigonometry
- The Chomsky_hierarchy of machines and languages
- Algebra (Solving equations; structures (groups, rings, fields,...)
- 3D coordinate geometry
- Elementary differential equations
- Electric and magnetic fields
- Algebraic structures
- Statistical analysis
- Models of Molecular Structures; nomenclature
- 3D tilings and crystallographic groups
- Coordinate geometry, Cartesian and Polar
- Conditional probabilities
- Elementary statistics
- The fields of rationals and reals
- Pseudospherical geometry (Lobachevsky)
- Projective geometry
- Geometric optics
- Periodic and Almost-periodic functions (Lissajous figures)
- Moving between Turtle Art and the physical world
Plugins
As of Version 106, there is plugin support for Turtle Art. The basic idea is to let developers add new palettes and blocks to support additional functionality without having to make changes to any of the core Turtle Art packages. If a plugin is present, it is loaded when Turtle Art is launched and any palettes or blocks defined by the plugin are made available to the user.
The plugin mechanism is currently used to provide support for sensors, the camera, RFID, and the Media, Extras, and Portfolio palettes. A plugin has been developed for WeDo (and here) and additional plugins are being developed for Arduino, NXT, and GoGo.
NOTE: As of Version 193, it is necessary to use a set of refactored plugins. These will be posted to the wiki ASAP.
How to install a plugin
Plugins are typically distributed as a *.tar.gz archive.
In versions 137+, there is a built-in method for installing plugins from Turtle Art itself:
- Download the plugin to your Sugar Journal, a USB key, or $HOME/Documents.
- Click on the 'Load plugin' button found on the Activity toolbar.
- Select the plugin downloaded in Step 1.
- Go to the Palette toolbar to confirm that the plugin has installed and loaded properly.
In early versions of Turtle Art, please follow these instructions:

In Gnome, click on the link in your browser and open with Archive Manager, extract the files in the plugins directory of the archive to
/home/olpc/Activities/TurtleArt.activity/plugins
you may need to make the Activities directory writeable first, in Terminal type
chmod 777 /home/olpc/Activities
If your distribution does not include Gnome, the following commands in Terminal will download the Physics archive to the current directory
cd ~/Activities/TurtleArt.activity
wget http://wiki.sugarlabs.org/images/c/c1/Physics-plugin.tar.gz
gunzip Physics-plugin.tar.gz
tar xvf Physics-plugin.tar
Note that you should not need root access to install plugins into your home directory.
How to uninstall a plugin
Your plugin is installed in a subdirectory of
/home/olpc/Activities/TurtleArt.activity/plugins
In Terminal or Gnome, delete that subdirectory. You may need to make the Activities directory writeable first, in Terminal type
chmod 777 /home/olpc/Activities
Available plugins
These plugins would typically already be installed
- turtleart-extras (the extra palettes that distinguish Turtle Blocks from Turtle Art)
- turtleart-camera
- turtleart-sensors
- rfid (This plugin allows interfacing with a RFID reader)
Xevents
Xevents it's a plugin for make accesibility interfaces in an easy way.

GIT code
http://sourceforge.net/p/butia/code/ci/master/tree/turtlebots/xevents/
Download
http://www.fing.edu.uy/inco/proyectos/butia/mediawiki/index.php/Archivo:Xevents.tar.gz
Wiki
http://wiki.sugarlabs.org/go/Xevents
Butia
Add a palette to control the Butiá robot

And a extra palette to control the hacks pin of USB4Butiá board and special sensors:

Andrés Aguirre is part of the Butiá team in Montevideo:
- We have released the 1.0 version of the sources, which has full integration with tortugarte (http://www.fing.edu.uy/inco/proyectos/butia/publicaciones.html). Last month we gave away nearly 30 Butiá robots in a robotic event organized by the University. These robots were given to secondary schools throughout the country, in this event we gave some tutorials and exercises to do with our help. One of the schools made a great line follower in tortugarte ;) : http://www.youtube.com/watch?v=Szp0LWLyPIg Then on the second day we give some tutorials and some children really enjoyed the experience, like Pedro a 10 year old child who really has programming skills! http://www.flickr.com/photos/butiarobot/5059177334/ http://www.youtube.com/aguirrea#p/u/7/p0y11iyhFko
- In future months we will go to the schools where we give the robots to continue teaching and giving new challenges. If you would like to see more about Butiá, we have a flickr site: http://www.flickr.com/photos/butiarobot/ and also a web page: http://www.fing.edu.uy/inco/proyectos/butia
Ceibal has this publication (in Spanish): [4]
Butiá is also featured in a short film by Antel [5] (go to 1:30).
Proyecto Butiá (in Spanish) , Activities/TurtleBots (in English)
GIT code
Download
FollowMe
This plugin uses the camera and get the position of an object of a color.
The plugin add this palette:

Examples
The "classic" use: on "Start", use the "Calibrate" block to open a window that shows the camera output. In the center of that window there is red square. The FollowMe Plugin uses an algorithm that obtains the "promedial" color of the object in the square. The result of that algorithm is shown in a small square in the corner. When you consider that the color is a good "representation of the object", press any key, the window will close, and FollowMe will use this color. After calibration, you can use the "X position" and "Y position" blocks. The block "X position" is the "center" of the object seen by the camera along the "X" (horizontal) axis. This value is an integer between 0 and 320. When the object is not detected,the algorithm returns -1. The operation of the "Y position" block are the same, but returns the position respect the "Y" (vertical) axis. The value returned is between 0 and 240.

When you know the color to "follow" (it occurs rarely, since the color varies under changing light conditions) you can use the "Follow RGB" block. This block sets the color directly to the algorithm. In all cases, the color has a threshold of 25 in each component set by default. With the "Threshold" block this value can be changed.

The third option, is to use the "FollowMe" block that "follows" a generic color similar to that shown.

Videos of the plugin ongoing:
FollowMe plugin in TurtleArt - Part 1
FollowMe plugin in TurtleArt - Part 2
The code used in this videos:

Download
Pattern detection
Add a palette to enable pattern detection with the camera.

Translation:
- "Viendo Señal": Pattern in sight
- "Distancia Señal" Pattern distance
This palette adds blocks to detect ARToolkit patterns and the distance to them. This plugin is an ARToolkit wrapper, and comes with several traffic signals already configured.
Examples
Here are some samples and videos on how to use the palette blocks.


Pattern detection plugin (in Spanish)
GIT code
Hosted with the Butiá source Pattern Detection in SourceForge (part of Butia project)
Download
WeDo
Tony Forster created a WeDo plugin based on the work of I.T. Daniher. Alan Aguiar has also helped with the plugin.
The source code repository is available here: [6].

Download
- File:Wedo plugin 2.tar.gz Version 2, which supports multiple WeDo devices.
- /wedo_plugin.tar.gz
Note: Check out https://github.com/itdaniher/WeDoMore/tree/master/udev for instructions on how to setup the proper permissions talk to the device. In the new versions of Sugar the udev is included.
LEGO NxT
Motors palette:

Sensors palette:

Examples

Moving the Turtle:
A crane: Example of Crane
GIT code
You can see all code in: NXT_plugin GIT
Downloads
LEGO NxT Plugin nxt_plugin.tar.gz
Expeyes
The Expeyes Plugin:

This is a first pass at a plugin for the ExpEyes Junior. For more info, see [8].
Note that you need to set up the udev rules for the device before first using this plugin by running the postinst script bundled with the plugin:
sudo sh ~/Activities/TurtleArt.activity/plugins/eyes/postinst
Arduino
The Arduino is an inexpensive single board computer which can be controlled by Turtle Art and used for robotics experiments. The XO-4 touchscreen laptop comes with two unpopulated circuit boards, the XOstick and the XOrduino.
The Arduino Plugin:

There are several efforts to develop Turtle Art support for Arduino.
- Setting up Turtle Arduino
- Read digital inputs File:Ard.ta
- Arduino write output File:Turtle Art Activity ardout.ta File:Tamyblock mouse.odt
- The Freetronics Leostick
The Arduino functionality was corrected from previous versions:
- Analog and digital reading now works correctly
- Auto detection of ttyUSBx port for FTDI device (Arduino board uses this for USB)
It requires the Firmata protocol to be uploaded to the Arduino board. (see here) Use the latest Firmata version (2.1 as of now) downloaded from the Firmata page (firmata.org) The Firmata version included with the Arduino IDE has some inconsistencies.
This version has english and spanish translations.
Examples

GIT code
You can see all code in: arduino_plugin GIT
Downloads
The plugin file can be downloaded from arduino_plugin.tar.gz.
Currency
This plugin adds a pallette of currency (notes and coins), these items can be acted on by arithmetic operators


- File:Oz-coins.tar.gz Australian coins plugin
- File:Oz-bills.tar.gz Australian bills plugin
- File:Oz-coins-and-bills.tar.gz Australian coins and bills plugin
- File:Colombia-currency.tar.gz Colombian peso plugin
- File:Mexican-currency.tar.gz Mexican peso plugin
- File:Paraguay-currency.tar.gz Paraguay Gurani plugin
- File:Rwanda-currency.tar.gz Rwanda francs plugin
- File:UY-currency.tar.gz Uruguayan peso plugin
- File:US-bills.tar.gz US dollars plugin
- File:Soles.tar.gz Peruvian Soles plugin
File:US-currency.tar.gz US dollars plugin
Nutrition
This is just a first rough pass at a plugin do calculations on the nutritional value of different food types. The plugin itself comes with some sample foods: apples, bananas, cookies, and cake. It is expected that the food choices will be customized by deployment. See https://www.choosemyplate.gov/SuperTracker/ for nutritional values (calories, protein, carbohydrates, fiber, and fat) of different foods.

Downloads
File:Food-plugin.tar.gz (Note: Requires TurtleBlocks v133 or greater)
Physics
This plugin allows you to construct a Physics model which can be saved to the Journal and run with the Physics Activity Activities/Physics

Use these blocks to create objects that are added to the bodylist and jointlist of a Box2d database used by the Physics Activity. Objects are positioned by the turtle x,y and colored based on the current pen attributes. From left to right:
- density: set the object density (0 is light; 1 is heavy)
- friction: set the object friction (0 is slippery; 1 is sticky)
- bounciness: set the object restitution (0 is rigid; 1 is bouncy)
- start polygon: use the current turtle x,y position to specify the first vertex of a polygon
- add point: use the current turtle x,y position to add a vertex to a polygon
- end polygon: use the current turtle x,y position to specify the last vertex of a polygon
- end filled polygon: use the current turtle x,y position to specify the last vertex of a filled polygon
- Note: The polygon must be 'normal', e.g., no crossed lines; no holes. Since Box2d does not support concave polygons, all polygons are converted to triangles (triangulation). (In Turtle Blocks, these triangles are shown by slight variations in color.)
- triangle: add a triangle object at the current turtle x,y position
- circle: add a circle object at the current turtle x,y position
- rectangle: add a rectangle object at the current turtle x,y position
- gear: add a gear object at the current turtle x,y position with the number of teeth as the argument
- gear radius: returns the radius of a gear with the number of teeth as the argument (useful for positioning gears)
- motor: add a motor at the current turtle x,y position (attached to the object at this position)
- pin: add a pin at the current turtle x,y position (attached to the object at this position) to prevent movement
- pen: add a pen at the current turtle x,y position (attached to the object at this position) to trace motion
- joint: add a joint between the object at the current turtle x,y position and the object at x, y
- save as Physics project: save the current bodylist and jointlist as a Physics project in the Journal
Note: The current model is cleared whenever the Erase button is pressed or a Clean block is run.
Example
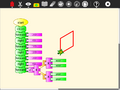
A simple gear and motor generated in Turtle Art:


For Turtle Blocks versions 107 - 183 File:TAgear.ta File:Gear.physics
For Turtle Blocks verisons 184 - [9]
A chain

Turtle Blocks project file: [10]
Downloads
File:Physics-plugin.tar.gz Physics plugin
Logic
This plugin provides logical bit operations in Turtle Art, such as AND, OR, XOR, NOT, logical shift left, logical shift right.

Example


Downloads
File:Logic.tar.gz Logic plugin
Math
The math plugin allows to use advanced mathematical functions in your program.

Download
http://people.sugarlabs.org/francis/tb-math-plugin/
Source code
https://github.com/sdanielf/turtleblocks-math
Mashape
This plugins enable the mashape palette (plugins using web APIs)
The mashape palette is easy to detect, its use a sugarized icon of original mashape icon. (A monkey :))
Also, this version include Translate plugin.


Download
Source code
https://github.com/ignaciouy/mashape-plugin
GNOME plugins
There are some plugins that are specific to running Turtle Art from the GNOME desktop. These include mechanisms for uploading projects to Facebook (See Activities/TurtleArt/Fb_plugin.py and http://turtleartsite.appspot.com/
(File:Turtleblocks-167.1.xo is the Alpha version of Turtle Art for GTK3. It requires GTK3 and GST1 (both available in Sugar 0.98 on OLPC 13.1.0 builds) This version includes the Facebook plugin.
TurtleArt + icaro = Tortucaro
See http://proyectofedora.org/argentina/?p=320
(The above link is down. The cached version of the page can be found at [11])
How to write a plugin
Your plugin should be placed in a subdirectory of the plugins directory. In that subdirectory, you need to create a .py file that defines a subclass of the Plugin class. The directory and .py file must have the same name and the subclass must also have the same name, with the additional requirement that the first letter of the class name be capitalized.
For example:
- the camera plugin,
camera_sensor.pyis in./plugins/camera_sensor - the class,
Camera_sensoris defined incamera_sensor.py, e.g.,
from plugins.plugin import Plugin
class Camera_sensor(Plugin):
In that subdirectory, you will also need a __init__.py file (which can be empty) and optionally, an icon subdirectory for your palette icon.
Turtle Art calls the __init__ method when starting up and traps import errors as its means to determine whether or not a plugin has the resources it needs to run. (You may want to remove this exception handler when debugging your plugin. It is in the _init_plugins method in tawindow.py.) It then calls the setup method when creating the palettes. It calls the start method whenever a stack of blocks is run and the stop method when execution is over. Also, there are methods for goto_background, return_to_foreground, and quit. (These methods are typically ignored.)
Adding a new palette is simply a matter of:
   palette = make_palette('mypalette',  # the name of your palette
                          colors=["#00FF00", "#00A000"],
                          help_string=_('Palette of my custom commands'))
For example, if we want to add a new turtle command, 'uturn', we'd use the add_block method in the Palette class.
   palette.add_block('uturn',  # the name of your block
                     style='basic-style',  # the block style
                     label=_('u turn'),  # the label for the block
                     prim_name='uturn',  # code reference (see below)
                     help_string=_('turns the turtle 180 degrees'))
   # Next, you need to define what your block will do:
   # def_prim takes 3 arguments: the primitive name, the number of
   # of arguments, 0 in this case, and the function to call, in this
   # case, the canvas function to set the heading.
   self.tw.lc.def_prim('uturn', 0, lambda self: self.tw.canvas.seth(self.tw.canvas.heading + 180))
That's it. When you next run Turtle Art, you will have a 'uturn' block
on the 'mypalette' palette.
You will have to create icons for the palette-selector buttons. These are kept in the icons subdirectory. You need two icons: mypaletteoff.svg and mypaletteon.svg, where 'mypalette' is the same string as the entry you used in instantiating the Palette class. Note that the icons should be the same size (55x55) as the others. (This is the default icon size for Sugar toolbars.)
As of Turtle Art v137, there is a built-in mechanism for installing plugins. Please include a plugin.info file in the top level of your tar.gz bundle.
plugin.info
myplugin
   myplugin.py
   __init.py__
   icons
      mypluginoff.svg
      mypluginon.svg
The plugin.info file must contain the following sections and fields:
[Plugin]
name=the name of your plugin
palette=the names of any palettes created by your plugin as a comma-separated list
e.g.,
[Plugin]
name=food
palette=eatme, food
Other fields, such as version, license, etc. may be used in the future.
Looking under the hood
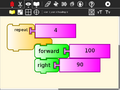
Turtle Art projects are stored as a .ta file contains a json-encoded serialization of the project.
The json encoding of a repeat 4 forward 100 right 90 project:
[
 [0,"repeat",331,158,[null,1,2,null]],
 [1,["number","4"],417,167,[0,null]],
 [2,"forward",426,207,[0,3,4]],
 [3,["number","100"],500,216,[2,null]],
 [4,"right",426,246,[2,5,null]],
 [5,["number","90"],500,255,[4,null]],
 [-1,"turtle",0,0,0,0,50,5]
]
The basic structure of the encoding is a list of lists, where each block has these elements:
- block number
- block name or [block name, block value]
- x position (deprecated)
- y position (deprecated)
- list of connections to other blocks
Turtles are encoded at the end of the list:
- -1
- turtle or [turtle, turtle name]
- x position
- y position
- heading
- pen color
- pen shade
- pen width
Modifying Turtle Art
Turtle Art is under the MIT license. You are free to use it and learn with it. You are also encourage to modify it to suit your needs or just for a further opportunity to learn.
Much of the motivation behind the Version 83 refactoring of the code was to make it easier for you to make changes. Most changes can be confined to two modules: taconstants.py and talogo.py. The former defines the blocks and palettes; the latter defines what code is executed by a block.
Note: As of Version 106, there is also support for plugins. If you can use the plugin mechanism to add support for additional devices, e.g., Arduino, or for making modifications such as are described below without making changes to the standard code base. (The advantage to the latter is that your changes will remain intact even after you upgrade to a newer version.)
The tabasics.py file contains the constants that by-in-large determine the behavior of Turtle Art. Notably, the block palettes are defined below. If you want to add a new block to Turtle Art, you could simply add a block of code to that file or to turtle_block_plugin.py, which contains additional blocks. (Even better, write your own plugin!!)
Adding a new palette is simply a matter of:
   palette = make_palette('mypalette',  # the name of your palette
                          colors=["#00FF00", "#00A000"],
                          help_string=_('Palette of my custom commands'))
For example, if we want to add a new turtle command, 'uturn', we'd use the add_block method in the Palette class.
   palette.add_block('uturn',  # the name of your block
                     style='basic-style',  # the block style
                     label=_('u turn'),  # the label for the block
                     prim_name='uturn',  # code reference (see below)
                     help_string=_('turns the turtle 180 degrees'))
Next, you need to define what your block will do. def_prim takes 3 arguments: the primitive name, the number of arguments—0 in this case—and the function to call—in this case, the canvas.seth function to set the heading.
   self.tw.lc.def_prim('uturn', 0,
       lambda self: self.tw.canvas.seth(self.tw.canvas.heading + 180))
That's it. When you next run Turtle Art, you will have a 'uturn' block on the 'mypalette' palette.
You will have to create icons for the palette-selector buttons. These are kept in the icons subdirectory. You need two icons: mypaletteoff.svg and mypaletteon.svg, where 'mypalette' is the same string as the entry you used in instantiating the Palette class. Note that the icons should be the same size (55x55) as the others. (This is the default icon size for Sugar toolbars.)
How to write a plugin
In Spanish: http://valentinbasel.fedorapeople.org/pdfs/turtle_art.pdf