Difference between revisions of "SoaS Blueberry Instructions"
Jump to navigation
Jump to search
m |
|||
| Line 36: | Line 36: | ||
* Download the '''Sugar on a Stick v2 Blueberry''' live image from here: http://download.sugarlabs.org/soas/releases/soas-2-blueberry.iso | * Download the '''Sugar on a Stick v2 Blueberry''' live image from here: http://download.sugarlabs.org/soas/releases/soas-2-blueberry.iso | ||
* Download the '''image-writer''' tool for Macs from here: http://download.sugarlabs.org/soas/releases/image-writer-mac | * Download the '''image-writer''' tool for Macs from here: http://download.sugarlabs.org/soas/releases/image-writer-mac | ||
| − | * Execute the following command | + | * Insert an empty USB stick |
| + | * Execute the following command in a terminal: ''cd Downloads; sudo python image-writer-mac soas-2-blueberry.iso'' | ||
* Proceed as stated in the instructions for Linux Users. | * Proceed as stated in the instructions for Linux Users. | ||
Revision as of 17:54, 3 December 2009
For Windows Users

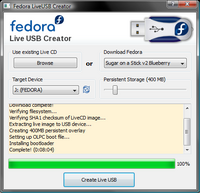
- Download the latest version of the Fedora LiveUSB Creator from http://fedorahosted.org/liveusb-creator and extract it.
- Plug a target USB flash drive into your computer (minimum 1-gigabyte).
- Launch LiveUSB Creator.
- Select Sugar on a Stick v2 Blueberry in the drop-down menu on the upper-right side.
- Adjust the Persistent Storage slider. This enables you to save your work in Sugar onto the device.
- Select your flash drive as the target and click the Create Live USB button.
- Wait for the process to finish, then close the LiveUSB Creator program.
- Stop your flash drive using the Safely Remove Hardware dialog and eject it.
For GNU/Linux Users
Linux Users will use a slightly different approach than Windows Users to ensure maximum compatibility with different distributions. Please follow the instructions carefully to ensure your data is preserved.
- If you are a Fedora User, run the following command: yum install liveusb-creator
- Launch LiveUSB the Creator and follow the instructions above.
- If you use any other distribution, download the image-writer tool from here and the live image from here.
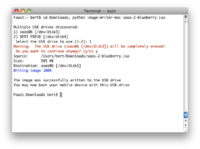
- Open a terminal and become root, either by using su or sudo.
- Enter the following command: ./image-writer soas-2-blueberry.iso
- WARNING: If you proceed here, your flash drive will be wiped!
- The script will output a device name; confirm that it matches with your flash drive.
- You will be notified once the process has finished.
For Mac OSX Users
The procedure for Mac OSX users is similar to the one for Linux users. Mac users should be aware that they may be able to prepare their flash drive on a Mac, but depending on the generation of the hardware used, they may need to use another computer to test whether the prepared flash drive works.

- Download the Sugar on a Stick v2 Blueberry live image from here: http://download.sugarlabs.org/soas/releases/soas-2-blueberry.iso
- Download the image-writer tool for Macs from here: http://download.sugarlabs.org/soas/releases/image-writer-mac
- Insert an empty USB stick
- Execute the following command in a terminal: cd Downloads; sudo python image-writer-mac soas-2-blueberry.iso
- Proceed as stated in the instructions for Linux Users.