User:Walter/sandbox/Connecting
Wiki-based Getting Started Guide (based on Joyride 2037)
Getting Connected
There are multiple ways to connect to the Internet:
- wireless access point (WiFi hotspot);
- “School Server” mesh network;
- “simple” mesh network, which lets you collaborate directly with other XOs;
- wired network (may require an external adapter—e.g., see USB Ethernet adaptors).
You make your connection from the Neighborhood view. Your current connection status is shown on the Frame.
Step 1: Go to the Neighborhood view
back | next
| Go to the Neighborhood view to connect to an access point. |
| Hint: The Neighborhood view is accessed by clicking on the Neighborhood icon on the Frame or by pressing the F1 key (OLPC-XO-1-specific hint) |

Step 2: Choose an access point
| Networks (access points) are represented by circles on the Neighborhood view. Networks can be identified by hovering over the circles: an access point is identified by its name (ESSID); a mesh-portal point—represented by a series of concentric circles—is identified by its channel number (1, 6, or 11). You can also search for an access point by name in the search bar at the top of the page. Signal strength is indicated by the fill-level of the circle. The color of the circle is based upon the name of the access point. Networks that are locked are identified by a badge. Access points that have been previously used (favorites) are identified by a star. |

Step 3: Activate a connection
To activate a network connection, click once inside the circle that corresponds to your chosen access point (or click on the ✔ Connect option in the hover menu). (OLPC-XO-1-specific hint)
While the connection is being established, the inside of the circle will blink. Once the connection is established, the outside of the circle will turn white. If for some reason the connection failed, the circle will stop blinking. Sometimes it is necessary to try several times before the connection is established.
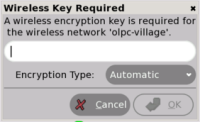
If the access point requires a key, you will be prompted. Note that different types of access points require different types of keys: be sure to select the correct type from the pull-down menu that is presented. Some access points (such as the Apple Extreme®) will only work with a hexadecimal value. If you have a password or passphrase, go to Hex Converter to get the hex key. Also, with the Apple Extreme you need to set “shared key”. Most other access points prefer the “open key” setting when using WEP.
Step 4: Checking the connection
| The connection status is detailed in a hover menu. |
| At any time (and from any view) you can check the status of your connection from the Frame. By hovering over the circle icon, you will find details about your connection status in a hover menu. |


Additional hints
- You make your connection from the Neighborhood view

- Your current connection status is shown on the Frame

- Access points are represented by circles. The fill level indicates signal strength

- Access points that require keys have a “locked” badge

- The color of the circle is calculated from the ESSID of the access point
- The name of the access point is displayed when you hover over it
- You connect by “clicking” in the center of the circle. The center of the circle will blink while the laptop is trying to connect

- Once you are connected, the rim of the circle turns white

- If the attempt to connect fails, the circle will stop blinking, but the rim will not turn white. Try again—it sometimes takes 2–3 tries to connect.
- Mesh portals are represented by a series of concentric circles

- The color of a mesh portal is the same as your XO color
- If your computer is "mesh enabled" and you don't specify a network, you will automatically be joined to a simple mesh network, enabling you to collaborate with others in the mesh, but not necessarily to access the Internet.
- You will be prompted if the access point requires a key

