Activity Team/Creating Activity Using Mono: Difference between revisions
No edit summary |
m moved Walter is a wanker 10/Creating Activity Using Mono to Activity Team/Creating Activity Using Mono over redirect: revert |
| (2 intermediate revisions by 2 users not shown) | |
(No difference)
| |
Latest revision as of 20:43, 23 February 2010
The objective of this Lab is to develop a new Sugar activity using C# and Mono. You will learn consecutively how to use MonoDevelop to write the source code of your activity, build a package, test your activity on Sugar and on a XO.
Step 1: Create your MonoDevelop project
- Launch MonoDevelop (Applications/Programming/MonoDevelop)
- Create a new solution (File/New Solution…)
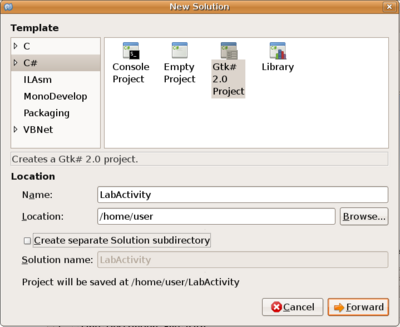
- Choose a "C# / Gtk# 2.0 Project" template. Fill the form with "LabActivity" as name. Uncheck the "Create separate Solution Directory"
- Click the "Forward" button.
- In the next window, don't change any option. Don't change the Gtk# version suggested. Don't check any checkbox. Then click on "OK".
The solution is now created. We're going to setup it.
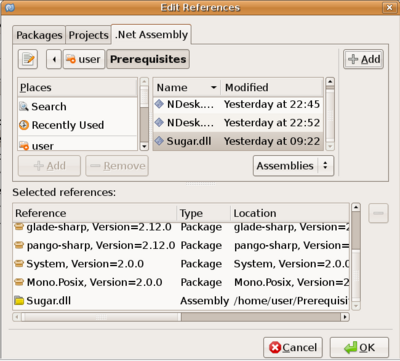
- Add reference on Sugar. Right click on References, "Edit References…", choose the ".Net Assemblies" sheet. Select "Sugar.dll" in the "/home/user/Prerequisites" directory. Click on the "+Add" button then OK.
- Remove the file "Main.cs" from the solution: right click on the Main.cs file, then choose "Remove" and check the "Delete from disk" box.
Step 2: Create a simple Window
- Update the content of the file MainWindow.cs like below. Note than this file is available on the "/home/user/LabSource/lab1/step2" directory.
	using System;
	using System.Collections;
	using Gtk;
	using Sugar;

	namespace LabActivity
	{
		public class MainWindow : Sugar.Window
		{
			public new static string activityId="";
			public new static string bundleId="";

			public MainWindow(string activityId, string bundleId) : base("Lab",activityId, bundleId)
			{
				this.SetDefaultSize(400, 400);
				this.Maximize();
				this.DeleteEvent += new DeleteEventHandler(OnMainWindowDelete);

				VBox vbox=new VBox();
				vbox.BorderWidth = 8;
				Label _text = new Label("Hello Lab Activity");
				vbox.Add(_text);
				Button _button = new Button();
				_button.Label = "Quit";
				_button.Clicked += new EventHandler(OnClick);
				vbox.Add(_button);

				this.Add(vbox);

				ShowAll();
			}

			void OnMainWindowDelete (object sender, DeleteEventArgs a)
			{
				Application.Quit();
				a.RetVal = true;
			}

			void OnClick(object sender, EventArgs a)
			{
				Application.Quit();
			}

			public static void Main(string[] args)
			{
				System.Console.Out.WriteLine("Lab Activity for OLPC");

				if (args.Length>0) {
					IEnumerator en= args.GetEnumerator();
					while (en.MoveNext()) {
 						if (en.Current.ToString().Equals("-s ugarActivityId")) {
			 				if (en.MoveNext()) {
								activityId=en.Current.ToString();
							}
						}
						if (en.Current.ToString().Equals("-sugarBundleId")) {
							if (en.MoveNext()) {
								bundleId=en.Current.ToString();
							}
						}
					}
				}

				Application.Init();
				new MainWindow(activityId, bundleId);
				Application.Run();
			}

		}
	}
- Save the file: "File/Save"
- Open the "User Interface" part of the solution, remove the file "LabActivity.MainWindow": right clic, choose "Delete", UNCHECK THE BOX "Also remove the 'MainWindow.cs'.
- Launch the build "Project/Build Solution"
- You don't any any error. Don't run the project for the moment.
Then copy libraries need to run the activity:
- Open a Terminal window (Applications/Accessories/Terminal).
- Change path to the binary directory (in /home/user/LabActivity/bin/Debug).
- Create a new subdirectory named "bin" using command "mkdir bin". Change path to this new directory.
- Copy in this directory all the shared libraries (.so) found in the "/home/user/Prerequisites" directory. For example with the command "cp /home/user/Prerequisites/*.so .":
- libgdksharpglue-2.so
- libgladesharpglue-2.so
- libglibsharpglue-2.so
- libgtksharpglue-2.so
- libMonoPosixHelper.so
- libpangosharpglue-2.so
- uiX11Util.so
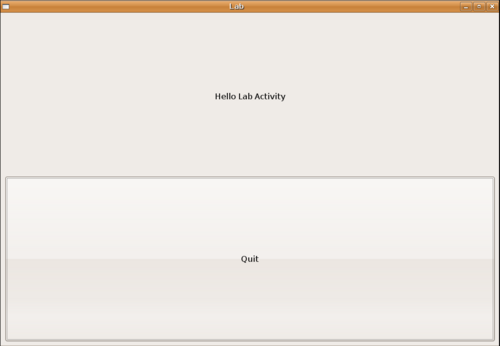
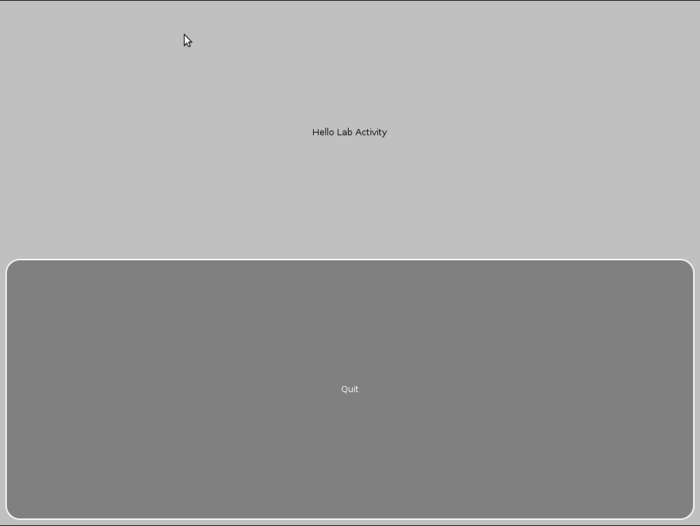
- Run the new application: "Project/Run", you should obtain this:
- Click on the button to quit.
Step 3: Prepare the Sugar package
Sugar applications need a specific packaging. We will build this in the workshop below. Note than the resulting files could be find in the "/home/user/LabSource/lab1/step3" directory.
See http://wiki.laptop.org/go/Activity_bundles for more information on Sugar package.
- Using the Terminal window, create a directory "LabActivity.activity" in "/home/user/LabActivity" using "mkdir LabActivity.activity"
- In this new directory, create a subdirectory named "activity" using "mkdir LabActivity.activity/activity"
- In this new directory, create a subdirectory named "bin" using "mkdir LabActivity.activity/bin"
- Change path to the "LabActivity.activity/activity" directory using "cd LabActivity.activity/activity"
We will now create a new icon for the activity. In Sugar, all icons are SVG files. A SVG file is a vector graphic image described as a XML file.
See http://wiki.laptop.org/go/Making_Sugar_Icons for more information on Sugar icons.
- Using "vi" or "MonoDevelop" create a new file "activity-labactivity.svg".
- Fill the file with the content:
<?xml version="1.0" encoding="UTF-8"?>
<!DOCTYPE svg PUBLIC "-//W3C//DTD SVG 1.1//EN" "http://www.w3.org/Graphics/SVG/1.1/DTD/svg11.dtd" [
    <!ENTITY stroke_color "#666666">
    <!ENTITY fill_color "#FFFFFF">
]>
<svg xmlns="http://www.w3.org/2000/svg" width="55" height="55">
    <rect x="5" y="5" width="45" height="45" stroke="&stroke_color;" fill="&fill_color;" stroke- width="3.5"/>
</svg>
We will now create un file "activity.info" to describe the activity:
- Using "vi" or "MonoDevelop" create a new file "activity.info".
- Fill the file with the content:
[Activity]
name = LabActivity
activity_version = 1
host_version = 1
service_name = org.olpcfrance.LabActivity
icon = activity-labactivity
exec = labactivity-activity
mime_types =
We will now create a MANIFEST. The MANIFEST contain the list of all files in the package. The MANIFEST file is locat at the root of the "LabActivity.activity" directory.
- Using "vi" or "MonoDevelop" create a new file "MANIFEST".
- Fill the file with the content:
activity/activity-labactivity.svg
activity/activity.info
bin/libgdksharpglue-2.so
bin/libgladesharpglue-2.so
bin/libglibsharpglue-2.so
bin/libgtksharpglue-2.so
bin/libMonoPosixHelper.so
bin/libpangosharpglue-2.so
bin/labactivity-activity
bin/labactivity.exe
bin/uiX11Util.so
We will now prepare the directory which hold the binaries. This directory will contain: the binary file resulting from the build process, the shared libraries needed and a script.
Let's copy first all the shared libraries needed. There are the same libraries used previously:
- Change path to the "bin" directory using "cd bin"
- Copy in this directory all the shared libraries (.so) found in the "/home/user/Prerequisites" directory. For example with the command "cp /home/user/Prerequisites/*.so .":
- libgdksharpglue-2.so
- libgladesharpglue-2.so
- libglibsharpglue-2.so
- libgtksharpglue-2.so
- libMonoPosixHelper.so
- libpangosharpglue-2.so
- uiX11Util.so
Let's now create the script file.
- Using "vi" or "MonoDevelop" create a new file "labactivity-activity".
Fill the file with the content:
#!/bin/sh
# Author: Lionel Laské
# Original Author: Torello Querci - Bert Freudenberg
# Purpose: Run mono binary application.
#
echo "$0" "$@"
echo

# arguments are unordered, have to loop
args=""
while [ -n "$2" ] ; do
    case "$1" in
        -b | --bundle-id)   bundle_id="$2"   ; args="$args BUNDLE_ID $2" ;;
        -a | --activity-id) activity_id="$2" ; args="$args ACTIVITY_ID $2";;
        -o | --object-id)   object_id="$2"   ; args="$args OBJECT_ID $2";;
        -u | --uri)         uri="$2"         ; args="$args URI $2";;
        *) echo unknown argument $1 $2 ;;
    esac
    shift;shift
done

# really need bundle id and activity id
if [ -z "$bundle_id" -o -z "$activity_id" ] ; then
  echo ERROR: bundle-id and activity-id arguments required
  echo Aborting
  exit 1
fi

# some debug output
echo launching $bundle_id instance $activity_id
[ -n "$object_id"   ] && echo with journal obj $object_id
[ -n "$uri"         ] && echo loading uri $uri
echo

# sanitize
[ -z "$SUGAR_PROFILE" ] && SUGAR_PROFILE=default
[ -z "$SUGAR_ACTIVITY_ROOT" ] && SUGAR_ACTIVITY_ROOT="$HOME/.sugar/$SUGAR_PROFILE/etoys"

export SUGAR_BUNDLE_PATH=`dirname $0`
export PATH=$SUGAR_BUNDLE_PATH:$PATH

cd $SUGAR_BUNDLE_PATH/..
export LD_LIBRARY_PATH=$SUGAR_BUNDLE_PATH:$LD_LIBRARY_PATH

# Try to setup the SHARED_DIR
export MONO_SHARED_DIR=$TMPDIR

# now run the mono application
if [ -z "$object_id" ] ; then
  exec labactivity.exe \
      -sugarBundleId $bundle_id \
      -sugarActivityId $activity_id \
      $args < /dev/null > /dev/null
else
  exec labactivity.exe \
      -sugarBundleId $bundle_id \
      -sugarActivityId $activity_id \
      -objectId $object_id \
      $args < /dev/null > /dev/null
fi
At the end of this step, your "/home/user/LabActivity/LabActivity.activity" directory should look like this :
user@ubuntu:~/LabActivity/LabActivity.activity$ ls -R
.:
activity  bin  MANIFEST

./activity:
activity.info  activity-labactivity.svg

./bin:
labactivity-activity    libglibsharpglue-2.so  libpangosharpglue-2.so
libgdksharpglue-2.so    libgtksharpglue-2.so   uiX11Util.so
libgladesharpglue-2.so  libMonoPosixHelper.so
Step 4: Build the Sugar package
We will now create the package for our activity. For this, we're going to use a script named "deploy".
- In the Terminal window, change path to the activity directory using command "cd /home/user/LabActivity"
- Copy the file "/home/user/Prerequisites/deploy" using "cp /home/user/Prerequisites/deploy .".
- Using "vi" or "MonoDevelop" create a new file, edit the file "deploy" to update variables ACTNAME and ACTLOWNAME at the begining of the file:
# Variable init
ACTNAME=LabActivity
ACTLOWNAME=labactivity
ACTVERSION=1
USERHOME=/home/user
HOSTDIR=/mnt/hgfs/D

# Change config to Mono GAC to use local path
echo Local config DLL
sudo cp /usr/lib/mono/gac/gtk-sharp/2.12.0.0__35e10195dab3c99f/local.config /usr/lib/mono/gac/gtk- sharp/2.12.0.0__35e10195dab3c99f/gtk-sharp.dll.config
sudo cp /usr/lib/mono/gac/glib-sharp/2.12.0.0__35e10195dab3c99f/local.config /usr/lib/mono/gac/glib-sharp/2.12.0.0__35e10195dab3c99f/glib-sharp.dll.config
sudo cp /usr/lib/mono/gac/gdk-sharp/2.12.0.0__35e10195dab3c99f/local.config /usr/lib/mono/gac/gdk-sharp/2.12.0.0__35e10195dab3c99f/gdk-sharp.dll.config
sudo cp /usr/lib/mono/gac/pango-sharp/2.12.0.0__35e10195dab3c99f/local.config /usr/lib/mono/gac/pango-sharp/2.12.0.0__35e10195dab3c99f/pango-sharp.dll.config
sudo cp /usr/lib/mono/gac/atk-sharp/2.12.0.0__35e10195dab3c99f/local.config /usr/lib/mono/gac/atk-sharp/2.12.0.0__35e10195dab3c99f/atk-sharp.dll.config

# Build the bundle
cd ${USERHOME}/${ACTNAME}/bin/Debug
echo Making bundle...
mkbundle2 --config /etc/mono/config --deps --static -o ${ACTLOWNAME}.exe ${ACTNAME}.exe Sugar.dll
echo Copying to template...
cp ${ACTLOWNAME}.exe ${USERHOME}/${ACTNAME}/${ACTNAME}.activity/bin

# Copy activity to local Sugar emulation
if [ -e "${USERHOME}/Activities/${ACTNAME}.activity" ] ; then
  echo Copying to local Sugar...
  rm -r ${USERHOME}/Activities/${ACTNAME}.activity
  cp -r ${USERHOME}/${ACTNAME}/${ACTNAME}.activity ${USERHOME}/Activities
fi

# Create a .XO package
echo Create a .XO
cd ${USERHOME}/${ACTNAME}
zip -r ${ACTNAME}.activity/* ${ACTNAME}.activity/activity/activity.info  ${ACTNAME}.activity/activity/activity-${ACTLOWNAME}.svg ${ACTNAME}.activity/MANIFEST
mv ${ACTNAME}.activity/*.zip ${USERHOME}/${ACTNAME}/${ACTNAME}-${ACTVERSION}.xo

# Copy .XO to VM host
echo Copy .XO to host
cp ${USERHOME}/${ACTNAME}/${ACTNAME}-${ACTVERSION}.xo ${HOSTDIR}

# Change config to Mono GAC to use global path
echo Global config DLL
sudo cp /usr/lib/mono/gac/gtk-sharp/2.12.0.0__35e10195dab3c99f/global.config /usr/lib/mono/gac/gtk-sharp/2.12.0.0__35e10195dab3c99f/gtk-sharp.dll.config
sudo cp /usr/lib/mono/gac/glib-sharp/2.12.0.0__35e10195dab3c99f/global.config /usr/lib/mono/gac/glib-sharp/2.12.0.0__35e10195dab3c99f/glib-sharp.dll.config
sudo cp /usr/lib/mono/gac/gdk-sharp/2.12.0.0__35e10195dab3c99f/global.config /usr/lib/mono/gac/gdk-sharp/2.12.0.0__35e10195dab3c99f/gdk-sharp.dll.config
sudo cp /usr/lib/mono/gac/pango-sharp/2.12.0.0__35e10195dab3c99f/global.config /usr/lib/mono/gac/pango-sharp/2.12.0.0__35e10195dab3c99f/pango-sharp.dll.config
sudo cp /usr/lib/mono/gac/atk-sharp/2.12.0.0__35e10195dab3c99f/global.config /usr/lib/mono/gac/atk-sharp/2.12.0.0__35e10195dab3c99f/atk-sharp.dll.config
Note that this file could be retrieve in the "/home/user/LabSource/lab1/step4" directory.
- Launch now this script using "./deploy". If a password is asked, type "user".
- At the end of the script, the directory should contain a file named "LabActivity-1.xo"
Step 5: Deploy and test the activity in Sugar Emulator
- Launch the sugar emulator using the desktop shortcut or using command "sugar-emulator"
- Once in Sugar, launch the "Terminal" activity
- Change path to the directory containing the ".xo" file using "cd LabActivity"
- Install the new activity using command "sugar-install-bundle LabActivity-1.xo". The install process should end by a "'LabActivity-1.xo' installed" message.
- Launch activity using command "sugar-launch LabActivity", you should obtain:
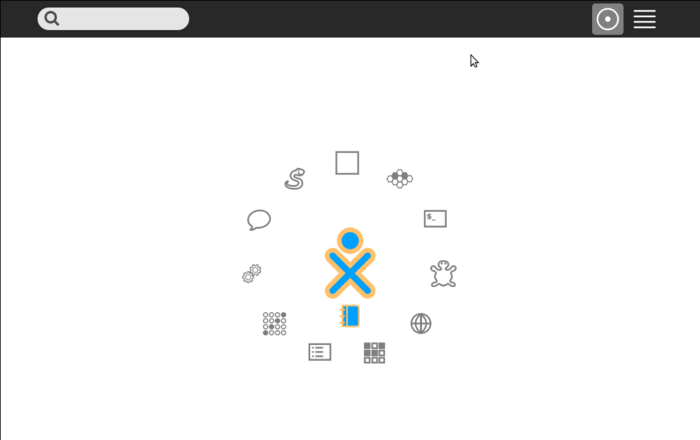
You could also run the activity from the Sugar circle by a click on the square icon (don't forget to add LabActivity in your favorite view).
Step 6: Deploy and test the activity on a XO
- To deploy the activity on a XO, just copy the "LabActivity-1.xo" file on a USB key. Then, launch the file from the Journal activity.
