Difference between revisions of "Activities/hMouse"
| (6 intermediate revisions by the same user not shown) | |||
| Line 1: | Line 1: | ||
<noinclude>{{Translations | [[Activities/hMouse|english]] | [[Activities/hMouse/lang-es|español]] |}}{{TOCright}} | <noinclude>{{Translations | [[Activities/hMouse|english]] | [[Activities/hMouse/lang-es|español]] |}}{{TOCright}} | ||
[[Category:Activities|hMouse]]</noinclude> | [[Category:Activities|hMouse]]</noinclude> | ||
| + | |||
| + | :''This is [[:Category:Translation in Progress| in the process of being translated.]]'' For the latest documentation, please refer to the [[Activities/hMouse/lang-es|Spanish]] version. | ||
| + | [[Category:Translation in Progress]]<noinclude> | ||
==Introduction== | ==Introduction== | ||
| Line 7: | Line 10: | ||
The h of hMouse comes from the English word 'head', but should be pronounced in Spanish, and 'Mouse' in English. | The h of hMouse comes from the English word 'head', but should be pronounced in Spanish, and 'Mouse' in English. | ||
| + | ==Additional Hardware== | ||
| + | The software follows a LED pointer, which could be made depending on the user preferences and mounted on the extremity that the user choose. Hence, the additional hardware could be built in many ways, being the prerequisite the light must be white, and preferably, to get optimum results, with high luminosity. | ||
| + | |||
| + | In the next, as an example of the possibles ways to make the device, it is presented a headband to mount a LED in the user head. | ||
| + | |||
| + | ===Materials=== | ||
| + | ====For the light==== | ||
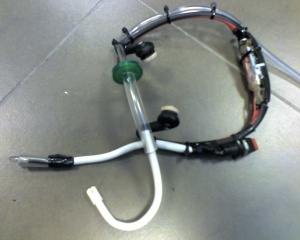
| + | [[File:Vincha hMouse.jpg|thumb|right|300px|The head band to mount the LED. Notice that it used to be headphones.]] | ||
| + | *High luminosity white LED | ||
| + | *Headphones, headband kind | ||
| + | *3 AA Batteries | ||
| + | *Switch to power on and off | ||
| + | *PVC pipe | ||
| + | *Copper wire | ||
| + | *Tin solder | ||
| + | ====For the filter==== | ||
| + | *Floppy disc (3 1/2"") | ||
| + | ====For the click==== | ||
| + | *Adapted mouse | ||
| + | *Button to the adapted mouse | ||
| + | |||
| + | ===Headband=== | ||
| + | To secure the LED to the user's head use a headband headphone. In the rear of the headphone is attached the battery along with the switch; it could be used silicon or another kind of glue. To on extremes of the headphone is mounted the PVC pipe. This pipe will serve two functions: it will contain the wires to the LED and in its end will be mounted the LED, and also, as the pipe is flexible, it will allow adjust the LED direction with ease. | ||
| + | In the end of the pipe, the LED is pasted with glue. Now you can make the connections with wire, from the batteries to the switch and from the switch to the LED. | ||
| + | |||
| + | ===Filter=== | ||
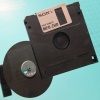
| + | [[File:Disquete desarmado.jpg|thumb|right|100px|Para el filtro utilizamos el disco que se encuentra en el interior.]] | ||
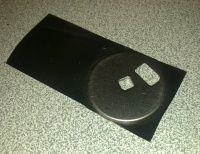
| + | [[File:Filtro.jpg|thumb|right|200px|Lo recortamos para que no tape la pantalla.]] | ||
| + | |||
| + | For optimum functionality in any light condition, it's possible use a physical filter for the camera, to avoid the ambient light and only the LED light will be visible to the camera. | ||
| + | |||
| + | To build the filter could be used the soft disc from the interior of a floppy disc. Because the intention is attach it to the XO camera, it must be cut to avoid the obstruction of the screen. To mount it we simply use the metallic center, putting it in the speaker it remains pasted by magnetism. If the disc is too much dark, it could be brightened with alcohol or another solvent. | ||
| + | |||
| + | ===Click=== | ||
| + | A click by software is not implemented yet, so is necessary do the click using hardware. | ||
| + | To make the click you could use an adapted mouse<ref>http://www.youtube.com/watch?v=jCOzx5211Xg</ref> and add it a button. In time to choose the button you must consider the user capacities and preferences. In the picture can be observed a button by blowing. | ||
===Usage=== | ===Usage=== | ||
| Line 18: | Line 57: | ||
==Licencia== | ==Licencia== | ||
| + | Copyright (C) 2011 Departamento de Ingeniería, Fundación Teletón, Montevideo, Uruguay | ||
| − | + | This program is free software: you can redistribute it and/or modify it under the terms of the GNU General Public License as published by the Free Software Foundation, either version 3 of the License, or (at your option) any later version. | |
| − | + | This program is distributed in the hope that it will be useful, but WITHOUT ANY WARRANTY; without even the implied warranty of MERCHANTABILITY or FITNESS FOR A PARTICULAR PURPOSE. See the GNU General Public License for more details. | |
| − | |||
| − | |||
| − | |||
| − | + | You should have received a copy of the GNU General Public License along with this program. If not, see <http://www.gnu.org/licenses/>. | |
| − | |||
| − | |||
| − | |||
| − | + | ==References== | |
| − | + | <references/> | |
Latest revision as of 09:55, 13 June 2011
- This is in the process of being translated. For the latest documentation, please refer to the Spanish version.
Introduction
hMouse allows to move the mouse pointer of the XO with the head or another body part. This is accomplished following a LED pointer with the camera. The LED pointer is attached to the head of the user using a very easy to made extra hardware. The h of hMouse comes from the English word 'head', but should be pronounced in Spanish, and 'Mouse' in English.
Additional Hardware
The software follows a LED pointer, which could be made depending on the user preferences and mounted on the extremity that the user choose. Hence, the additional hardware could be built in many ways, being the prerequisite the light must be white, and preferably, to get optimum results, with high luminosity.
In the next, as an example of the possibles ways to make the device, it is presented a headband to mount a LED in the user head.
Materials
For the light
- High luminosity white LED
- Headphones, headband kind
- 3 AA Batteries
- Switch to power on and off
- PVC pipe
- Copper wire
- Tin solder
For the filter
- Floppy disc (3 1/2"")
For the click
- Adapted mouse
- Button to the adapted mouse
Headband
To secure the LED to the user's head use a headband headphone. In the rear of the headphone is attached the battery along with the switch; it could be used silicon or another kind of glue. To on extremes of the headphone is mounted the PVC pipe. This pipe will serve two functions: it will contain the wires to the LED and in its end will be mounted the LED, and also, as the pipe is flexible, it will allow adjust the LED direction with ease. In the end of the pipe, the LED is pasted with glue. Now you can make the connections with wire, from the batteries to the switch and from the switch to the LED.
Filter
For optimum functionality in any light condition, it's possible use a physical filter for the camera, to avoid the ambient light and only the LED light will be visible to the camera.
To build the filter could be used the soft disc from the interior of a floppy disc. Because the intention is attach it to the XO camera, it must be cut to avoid the obstruction of the screen. To mount it we simply use the metallic center, putting it in the speaker it remains pasted by magnetism. If the disc is too much dark, it could be brightened with alcohol or another solvent.
Click
A click by software is not implemented yet, so is necessary do the click using hardware. To make the click you could use an adapted mouse[1] and add it a button. In time to choose the button you must consider the user capacities and preferences. In the picture can be observed a button by blowing.
Usage
The LED must aim directly the camera and could, for example, be mounted in the user's right temple using a headband. To get optimal results the LED light must be high power (eg. 4.5 V), the user must be in a dark environment, with a uniform and opaque background, or by defect, use a translucid filter for the camera. The click must be done using other method, due the activity doesn't support this action yet. The program has a little help that explains quickly the steps to follow and then, each of it has its own instructions to guide the user trought the proccess. Also it has the option "Watch Camera", to allow watch what the camera is seeing, useful to test if the LED is correctly pointed and the user is in a favorable position.
First of all the user must calibrate the software. This must done because the distance and position of the user in face of the camera will change in each use, hence is necessary reconfigurate the image are in wich the program will search the LED.
Licencia
Copyright (C) 2011 Departamento de Ingeniería, Fundación Teletón, Montevideo, Uruguay
This program is free software: you can redistribute it and/or modify it under the terms of the GNU General Public License as published by the Free Software Foundation, either version 3 of the License, or (at your option) any later version.
This program is distributed in the hope that it will be useful, but WITHOUT ANY WARRANTY; without even the implied warranty of MERCHANTABILITY or FITNESS FOR A PARTICULAR PURPOSE. See the GNU General Public License for more details.
You should have received a copy of the GNU General Public License along with this program. If not, see <http://www.gnu.org/licenses/>.


