Difference between revisions of "Documentation Team/User Manual/Connecting to the Internet"
(general fleshing out....) |
m (moved Walter is a wanker 9/User Manual/Connecting to the Internet to Documentation Team/User Manual/Connecting to the Internet over redirect: revert) |
||
| (13 intermediate revisions by 7 users not shown) | |||
| Line 1: | Line 1: | ||
| + | <noinclude>{{GoogleTrans-en}}</noinclude> | ||
You make your connection to the Internet from the Neighborhood view. Your current connection status is shown on the Home view. (The XO was designed for wireless access because in the developing world, wireless is actually the fastest, most reliable, and least expensive way to connect.) | You make your connection to the Internet from the Neighborhood view. Your current connection status is shown on the Home view. (The XO was designed for wireless access because in the developing world, wireless is actually the fastest, most reliable, and least expensive way to connect.) | ||
| Line 4: | Line 5: | ||
'''Step 1: Go to the Neighborhood view''' | '''Step 1: Go to the Neighborhood view''' | ||
| − | Click on the Network symbol [[Image:Stock-zoom-mesh.png]] (circle with 8 dots), | + | Click on the Network symbol in the Frame [[Image:Stock-zoom-mesh.png]] (a circle with 8 dots), or on the XO keyboard press a key with that symbol in the upper-left corner of the keyboard, to go to the Neighborhood view. On standard keyboards, press the F1 key. From here you can connect to an Wi-Fi access point and see, if connected to a mesh or Jabber network, other Sugar Learners. |
You will see this screen. | You will see this screen. | ||
| Line 10: | Line 11: | ||
[[Image:Connecting-1.gif]]. | [[Image:Connecting-1.gif]]. | ||
| − | + | You're a Sugar Learner, represented by the XO icon in the center of the screen. | |
| Line 17: | Line 18: | ||
[[Image:Connecting-2.gif]] | [[Image:Connecting-2.gif]] | ||
| − | + | The OLPC XO-1's three Mesh Networks (portal point) are represented by circles of the same colors as your Sugar Learner icon. Networks (access points) are represented by circles of other colors. | |
Hovering over a circles opens a pop-pup window that identifies the network: an access point is identified by its name (ESSID); a portal point is identified by its channel number (1, 6, or 11). You can also search for an access point by name in the search bar at the top of the page. | Hovering over a circles opens a pop-pup window that identifies the network: an access point is identified by its name (ESSID); a portal point is identified by its channel number (1, 6, or 11). You can also search for an access point by name in the search bar at the top of the page. | ||
| Line 29: | Line 30: | ||
To activate a network or mesh connection, position your mouse inside the circle that corresponds to your chosen access point and click. (To “click”, press once on the left-hand touchpad button—the button with the × symbol at the front of the touchpad.) While the XO is trying to establish the connection, the inside of the circle will blink. Once the connection is established, the outside of the circle will turn white. If for some reason the connection failed, the circle will stop blinking and the outside edge will keep its original color. Sometimes it is necessary to try several times before the connection is established. | To activate a network or mesh connection, position your mouse inside the circle that corresponds to your chosen access point and click. (To “click”, press once on the left-hand touchpad button—the button with the × symbol at the front of the touchpad.) While the XO is trying to establish the connection, the inside of the circle will blink. Once the connection is established, the outside of the circle will turn white. If for some reason the connection failed, the circle will stop blinking and the outside edge will keep its original color. Sometimes it is necessary to try several times before the connection is established. | ||
| − | If you don't specify a network, Sugar will attempt to join a simple mesh network, enabling you to collaborate with other Sugar | + | If you don't specify a network, Sugar will attempt to join a simple mesh network, enabling you to collaborate with other Sugar Learners, but not access the Internet. |
If the access point requires a key, you will be prompted. Note that different types of access points require different types of keys: be sure to select the correct type from the pull-down menu that is presented. | If the access point requires a key, you will be prompted. Note that different types of access points require different types of keys: be sure to select the correct type from the pull-down menu that is presented. | ||
| + | * For older builds, you may need to use a hexidecimal encoding of your passphrase. See this [http://www.xs4all.nl/~rjoris/wpapsk.html hexidecimal key conversion page]. | ||
* Some access points (such as the Apple Extreme®) will only work with a hexadecimal value. If you have a password or passphrase, [http://www.corecoding.com/utilities/wep2hex.php go to Hex Converter to get the hex key]. | * Some access points (such as the Apple Extreme®) will only work with a hexadecimal value. If you have a password or passphrase, [http://www.corecoding.com/utilities/wep2hex.php go to Hex Converter to get the hex key]. | ||
* If you are using and Apple Extreme you need to set “shared key”. Most other access points prefer the “open key” setting when using WEP. | * If you are using and Apple Extreme you need to set “shared key”. Most other access points prefer the “open key” setting when using WEP. | ||
| − | |||
| − | |||
'''Step 4: Checking the connection''' | '''Step 4: Checking the connection''' | ||
| − | Click on Home symbol [[Image:Stock-zoom-home.png]], found in the upper-left corner of the keyboard, to go to the Home view to check your wireless connection. | + | Click on the Home symbol [[Image:Stock-zoom-home.png]] (a circle with a center dot), found in the upper-left corner of the keyboard, to go to the Home view to check your wireless connection. |
[[Image:Connecting-4.gif]] | [[Image:Connecting-4.gif]] | ||
| Line 47: | Line 47: | ||
| − | For more information about connecting, please see | + | For more information about connecting, please see this OLPC wiki page [[olpc:Support_FAQ#Internet.2C_Connectivity.2C_Email.2C_Chat | Support FAQ: Internet, Connectivity, Email, Chat]]. |
Latest revision as of 19:15, 24 February 2010
You make your connection to the Internet from the Neighborhood view. Your current connection status is shown on the Home view. (The XO was designed for wireless access because in the developing world, wireless is actually the fastest, most reliable, and least expensive way to connect.)
Step 1: Go to the Neighborhood view
Click on the Network symbol in the Frame ![]() (a circle with 8 dots), or on the XO keyboard press a key with that symbol in the upper-left corner of the keyboard, to go to the Neighborhood view. On standard keyboards, press the F1 key. From here you can connect to an Wi-Fi access point and see, if connected to a mesh or Jabber network, other Sugar Learners.
(a circle with 8 dots), or on the XO keyboard press a key with that symbol in the upper-left corner of the keyboard, to go to the Neighborhood view. On standard keyboards, press the F1 key. From here you can connect to an Wi-Fi access point and see, if connected to a mesh or Jabber network, other Sugar Learners.
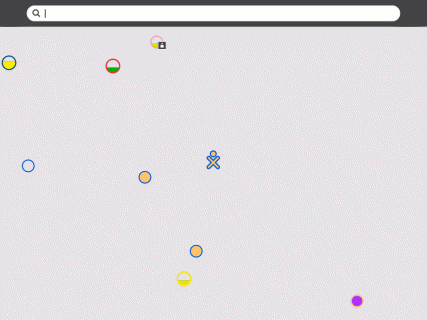
You will see this screen.
You're a Sugar Learner, represented by the XO icon in the center of the screen.
Step 2: Choose an access point
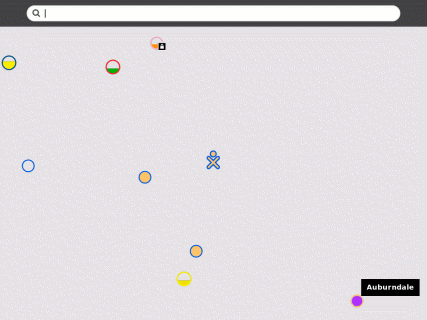
The OLPC XO-1's three Mesh Networks (portal point) are represented by circles of the same colors as your Sugar Learner icon. Networks (access points) are represented by circles of other colors.
Hovering over a circles opens a pop-pup window that identifies the network: an access point is identified by its name (ESSID); a portal point is identified by its channel number (1, 6, or 11). You can also search for an access point by name in the search bar at the top of the page.
Signal strength is indicated by the fill-level of the circle. Networks that are locked and require a password to use are identified by a small lock symbol at the lower edge of the circle.
Step 3: Activate a connection
To activate a network or mesh connection, position your mouse inside the circle that corresponds to your chosen access point and click. (To “click”, press once on the left-hand touchpad button—the button with the × symbol at the front of the touchpad.) While the XO is trying to establish the connection, the inside of the circle will blink. Once the connection is established, the outside of the circle will turn white. If for some reason the connection failed, the circle will stop blinking and the outside edge will keep its original color. Sometimes it is necessary to try several times before the connection is established.
If you don't specify a network, Sugar will attempt to join a simple mesh network, enabling you to collaborate with other Sugar Learners, but not access the Internet.
If the access point requires a key, you will be prompted. Note that different types of access points require different types of keys: be sure to select the correct type from the pull-down menu that is presented.
- For older builds, you may need to use a hexidecimal encoding of your passphrase. See this hexidecimal key conversion page.
- Some access points (such as the Apple Extreme®) will only work with a hexadecimal value. If you have a password or passphrase, go to Hex Converter to get the hex key.
- If you are using and Apple Extreme you need to set “shared key”. Most other access points prefer the “open key” setting when using WEP.
Step 4: Checking the connection
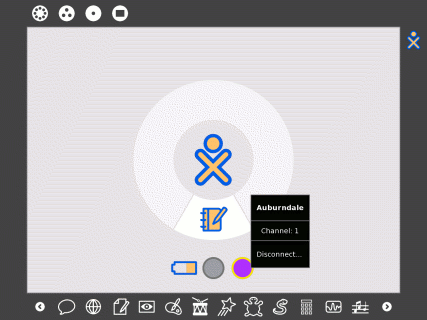
Click on the Home symbol ![]() (a circle with a center dot), found in the upper-left corner of the keyboard, to go to the Home view to check your wireless connection.
(a circle with a center dot), found in the upper-left corner of the keyboard, to go to the Home view to check your wireless connection.
By hovering over the circle icon, you will find details about your connection status.
For more information about connecting, please see this OLPC wiki page Support FAQ: Internet, Connectivity, Email, Chat.


