Difference between revisions of "SoaS Blueberry Instructions"
(content updates) |
m (some smaller changes) |
||
| Line 15: | Line 15: | ||
* Plug a target USB flash drive into your computer (minimum 1-gigabyte). | * Plug a target USB flash drive into your computer (minimum 1-gigabyte). | ||
* Launch LiveUSB Creator. | * Launch LiveUSB Creator. | ||
| − | * Select '''Sugar on a Stick | + | * Select '''Sugar on a Stick v2 Blueberry''' in the drop-down menu on the upper-right side. |
* Adjust the Persistent Storage slider. This enables you to save your work in Sugar onto the device. | * Adjust the Persistent Storage slider. This enables you to save your work in Sugar onto the device. | ||
* Select your flash drive as the target and click the '''Create Live USB''' button. | * Select your flash drive as the target and click the '''Create Live USB''' button. | ||
* Wait for the process to finish, then close the LiveUSB Creator program. | * Wait for the process to finish, then close the LiveUSB Creator program. | ||
* Stop your flash drive using the '''Safely Remove Hardware''' dialog and eject it. | * Stop your flash drive using the '''Safely Remove Hardware''' dialog and eject it. | ||
| − | + | <br/> | |
| − | == For Linux Users == | + | == For GNU/Linux Users == |
'''TODO: add screenshot here & add liveusb-creator instructions!''' | '''TODO: add screenshot here & add liveusb-creator instructions!''' | ||
| Line 28: | Line 28: | ||
with different distributions. Please follow the instructions carefully to ensure your data is preserved. | with different distributions. Please follow the instructions carefully to ensure your data is preserved. | ||
| − | * Download the '''Sugar on a Stick | + | * Download the '''Sugar on a Stick v2 Blueberry''' live image from here: http://download.sugarlabs.org/soas/releases/soas-2-blueberry.iso |
* If you are a '''Fedora User''', download the '''livecd-iso-to-disk''' script from here: http://download.sugarlabs.org/soas/releases/livecd-iso-to-disk.sh | * If you are a '''Fedora User''', download the '''livecd-iso-to-disk''' script from here: http://download.sugarlabs.org/soas/releases/livecd-iso-to-disk.sh | ||
** Become root and execute the following command in a terminal: ''./livecd-iso-to-disk.sh --overlay-size-mb xxx --delete-home ./soas-2-blueberry.iso /dev/sdX'' | ** Become root and execute the following command in a terminal: ''./livecd-iso-to-disk.sh --overlay-size-mb xxx --delete-home ./soas-2-blueberry.iso /dev/sdX'' | ||
| Line 40: | Line 40: | ||
** You will be notified once the process has finished. | ** You will be notified once the process has finished. | ||
| − | == For Mac | + | == For Mac OSX Users == |
The procedure for Mac OS/X users is similar to the one for Linux users. Mac users should be aware that they may be able to prepare their flash drive on a Mac, but depending on the generation of the hardware used, they may need to use another computer to test whether the prepared flash drive works. | The procedure for Mac OS/X users is similar to the one for Linux users. Mac users should be aware that they may be able to prepare their flash drive on a Mac, but depending on the generation of the hardware used, they may need to use another computer to test whether the prepared flash drive works. | ||
| Line 46: | Line 46: | ||
[[Image:image-writer-mac.png|left|200px]] | [[Image:image-writer-mac.png|left|200px]] | ||
| − | * Download the Sugar on a Stick | + | * Download the Sugar on a Stick v2 Blueberry live image from here: http://download.sugarlabs.org/soas/releases/soas-2-blueberry.iso |
* Open a terminal and run: ''diskutil unmountDisk /dev/diskX'' (whereas X is the device number) | * Open a terminal and run: ''diskutil unmountDisk /dev/diskX'' (whereas X is the device number) | ||
* Run: ''sudo dd if=./soas-2-blueberry.iso of=/dev/diskX bs=512'' (Please pay attention when running the dd command, as it will wipe your flash drive!) | * Run: ''sudo dd if=./soas-2-blueberry.iso of=/dev/diskX bs=512'' (Please pay attention when running the dd command, as it will wipe your flash drive!) | ||
* Eject your flash drive by running: ''diskutil eject /dev/diskX'' | * Eject your flash drive by running: ''diskutil eject /dev/diskX'' | ||
| + | <br/> | ||
| + | == For More Information == | ||
| − | + | In case you encounter issues, please report them here<br/> | |
| + | https://launchpad.net/soas | ||
| − | + | Do not hesitate to e-mail us with any feedback at<br/> | |
| + | [mailto:feedback@sugarlabs.org feedback@sugarlabs.org] | ||
For more information, please visit<br/> | For more information, please visit<br/> | ||
Revision as of 10:14, 27 November 2009
| |
For Windows Users
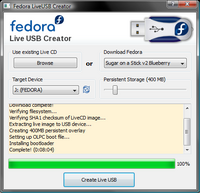
- Download the latest version of the Fedora LiveUSB Creator from http://fedorahosted.org/liveusb-creator and extract it.
- Plug a target USB flash drive into your computer (minimum 1-gigabyte).
- Launch LiveUSB Creator.
- Select Sugar on a Stick v2 Blueberry in the drop-down menu on the upper-right side.
- Adjust the Persistent Storage slider. This enables you to save your work in Sugar onto the device.
- Select your flash drive as the target and click the Create Live USB button.
- Wait for the process to finish, then close the LiveUSB Creator program.
- Stop your flash drive using the Safely Remove Hardware dialog and eject it.
For GNU/Linux Users
TODO: add screenshot here & add liveusb-creator instructions!
Linux Users will use a slightly different approach than Windows Users to ensure maximum compatibility with different distributions. Please follow the instructions carefully to ensure your data is preserved.
- Download the Sugar on a Stick v2 Blueberry live image from here: http://download.sugarlabs.org/soas/releases/soas-2-blueberry.iso
- If you are a Fedora User, download the livecd-iso-to-disk script from here: http://download.sugarlabs.org/soas/releases/livecd-iso-to-disk.sh
- Become root and execute the following command in a terminal: ./livecd-iso-to-disk.sh --overlay-size-mb xxx --delete-home ./soas-2-blueberry.iso /dev/sdX
- Replace "xxx" with the amount (in MB) of persistent storage you wish to allocate for saving you work in Sugar to the flash drive. We suggest at least 512 MB.
- Replace "X" with the letter/number identifier of your flash drive.
- Advanced usage: You can simultaneously format your flash drive by adding the option --format --reset-mbr when you call the livecd-iso-to-disk script.
- Become root and execute the following command in a terminal: ./livecd-iso-to-disk.sh --overlay-size-mb xxx --delete-home ./soas-2-blueberry.iso /dev/sdX
- If you use any other distribution, download the image-writer tool from here: http://download.sugarlabs.org/soas/releases/image-writer
- Open a terminal and become root, either by using su or sudo.
- Enter the following command: ./image-writer soas-2-blueberry.iso
- The script will output a device name; confirm that it matches with your flash drive.
- You will be notified once the process has finished.
For Mac OSX Users
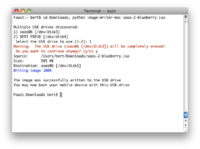
The procedure for Mac OS/X users is similar to the one for Linux users. Mac users should be aware that they may be able to prepare their flash drive on a Mac, but depending on the generation of the hardware used, they may need to use another computer to test whether the prepared flash drive works.
- Download the Sugar on a Stick v2 Blueberry live image from here: http://download.sugarlabs.org/soas/releases/soas-2-blueberry.iso
- Open a terminal and run: diskutil unmountDisk /dev/diskX (whereas X is the device number)
- Run: sudo dd if=./soas-2-blueberry.iso of=/dev/diskX bs=512 (Please pay attention when running the dd command, as it will wipe your flash drive!)
- Eject your flash drive by running: diskutil eject /dev/diskX
For More Information
In case you encounter issues, please report them here
https://launchpad.net/soas
Do not hesitate to e-mail us with any feedback at
feedback@sugarlabs.org
For more information, please visit
www.sugarlabs.org
About This Document
A PDF layout of this file is available at http://people.sugarlabs.org/sdz/soas-v2-instructions.pdf with SVG source at http://people.sugarlabs.org/sdz/soas-v2-instructions.svg. Note that the wiki page version is likely to be more up-to-date.


