Difference between revisions of "Features/WPA-WPA2-Enterprise-Network-Connections/Testing"
Jump to navigation
Jump to search
(Created page with "== Setting up a RADIUS server ==") |
|||
| (25 intermediate revisions by one other user not shown) | |||
| Line 1: | Line 1: | ||
| − | == Setting up a RADIUS server == | + | == Setting up a RADIUS server (on a dedicated machine) == |
| + | * Install "freeradius" rpm package | ||
| + | ** sudo yum install freeradius | ||
| + | * Stop the server (if running) | ||
| + | ** sudo killall radiusd | ||
| + | * Modify "/etc/raddb/clients.conf", to include the name of the network access-point/router. Sample files are present at | ||
| + | **[[Media:original_clients.doc]] | ||
| + | **[[Media:modified_clients.doc]] | ||
| + | **[[Media:diff_clients.doc]]. | ||
| + | * Modify "/etc/raddb/users", to configure a username-password pair for authentication. Sample files are present at | ||
| + | **[[Media:original_users.doc]] | ||
| + | **[[Media:modified_users.doc]] | ||
| + | **[[Media:diff_users.doc]] | ||
| + | *Fedora 17 users, please run the following command, before starting the radius server: | ||
| + | **sudo mv /etc/raddb/modules/dhcp_sqlippool ~ | ||
| + | * Start the server, by issuing the following command: | ||
| + | ** sudo /usr/sbin/radiusd -X & | ||
| + | |||
| + | == Setting up the access-point / router == | ||
| + | * Connect the access-point/router, with the RADIUS server machine, through a ethernet cable. | ||
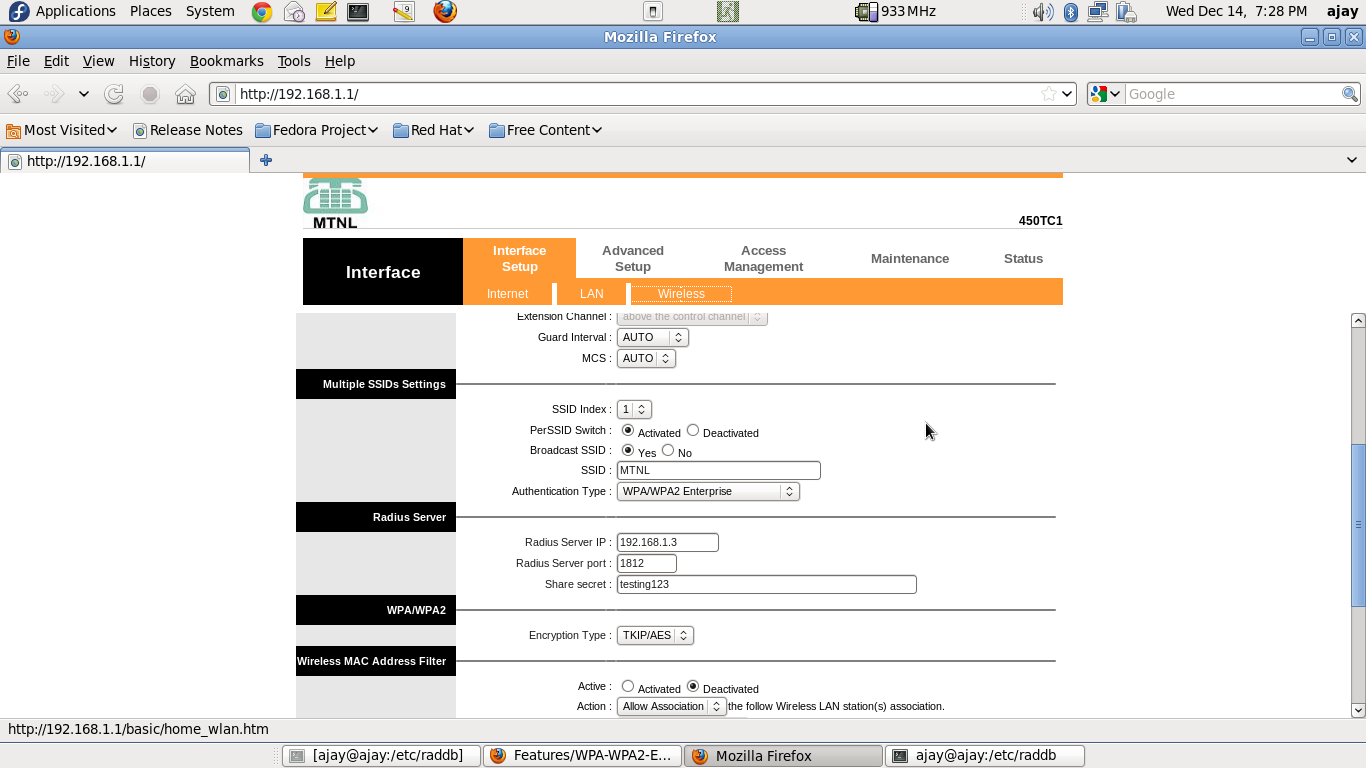
| + | * Through the RADIUS server machine, open the browser, type in the access-point/router IP address, and configure it for WPA/WPA2-Enterprise authentication. A sample screenshot is presented below | ||
| + | |||
| + | |||
| + | **[[File:router_configuration.png]] | ||
| + | |||
| + | |||
| + | * Note that, you may only need to enter the "Radius Server IP Address" ("192.168.1.3" in the screenshot). The "Radius Server Port", and "Share Secret" are the default ones (at least for a default setup of freeradius). | ||
| + | |||
| + | |||
| + | |||
| + | |||
| + | |||
| + | |||
| + | |||
| + | == Connecting a client - TLS-based authentication == | ||
| + | * Make sure you have three certificates - user-certificate, ca-certificate, private-key - before you proceed. One way to get these certificates is as follows: | ||
| + | ** Go to the RADIUS server machine, and navigate to "/etc/raddb/certs" | ||
| + | ** Run the following commands | ||
| + | *** sudo make client.pem | ||
| + | *** sudo chmod 0644 client.p12 | ||
| + | *** sudo chmod 0644 ca.pem | ||
| + | *** Transfer "client.p12" and "ca.pem" to a USB drive. | ||
| + | *** Use this USB drive, in the subsequent steps. | ||
| + | * Navigate to the "Neighbourhood view" on the XO. | ||
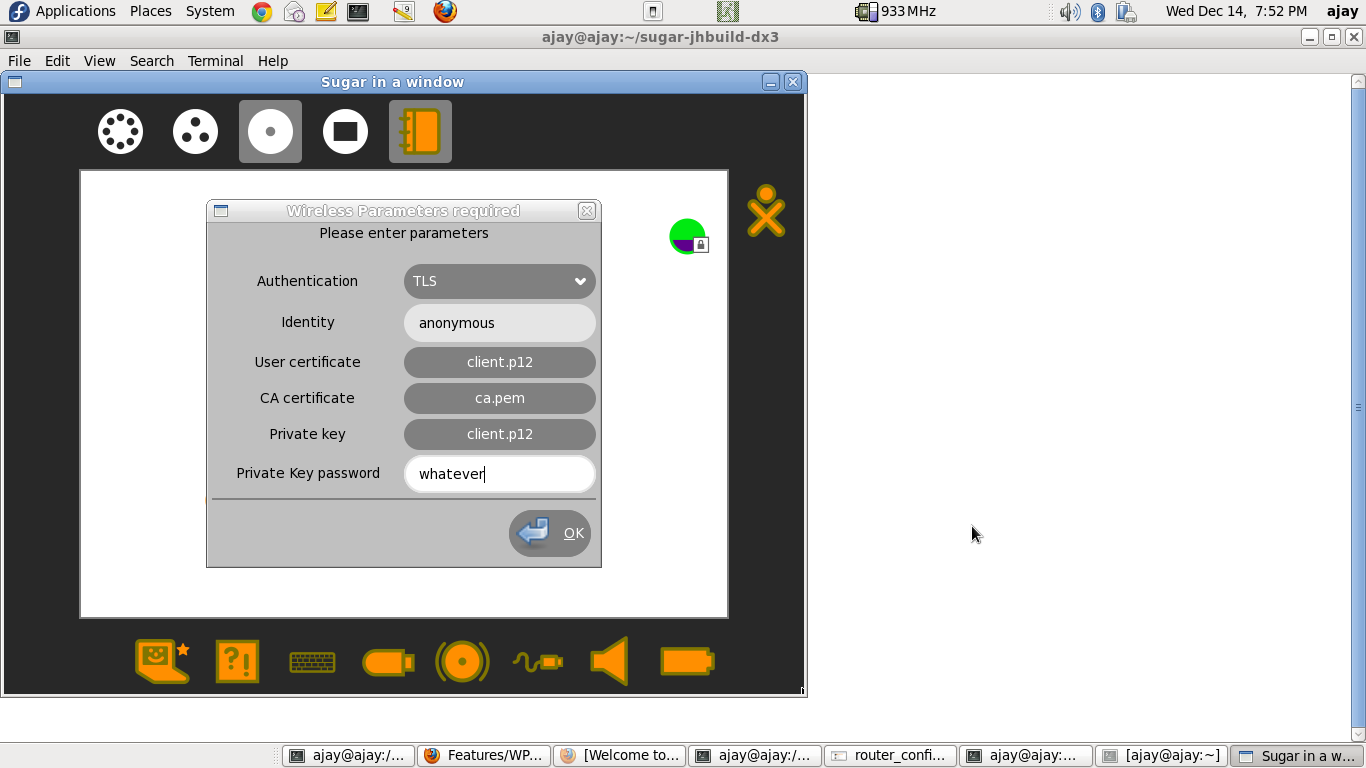
| + | * Click on the network-icon, and enter the parameters, as seen in the following screenshot | ||
| + | |||
| + | |||
| + | ** [[File:TLS_authentication.png]] | ||
| + | |||
| + | |||
| + | * NOTES | ||
| + | ** If either of "User Certificate", or "Private Key" is in ".p12" format, both these entries should be EXACTLY equal, since the ".p12" certificate contains both. | ||
| + | ** For entering the "User certificate", "CA certificate" and "Private Key", you will be taken to the "Journal-Chooser". You may use the certificates that were retrieved earlier. | ||
| + | |||
| + | |||
| + | |||
| + | |||
| + | |||
| + | |||
| + | == Connecting a client - LEAP-based authentication == | ||
| + | * Help required !!!! | ||
| + | * We have not been able to set-up a LEAP-authentication-supported access-point / router. | ||
| + | * Any CISCO guys !!?? | ||
| + | |||
| + | |||
| + | |||
| + | |||
| + | |||
| + | |||
| + | == Connecting a client - TTLS-based authentication == | ||
| + | * Navigate to the "Neighbourhood view" on the XO. | ||
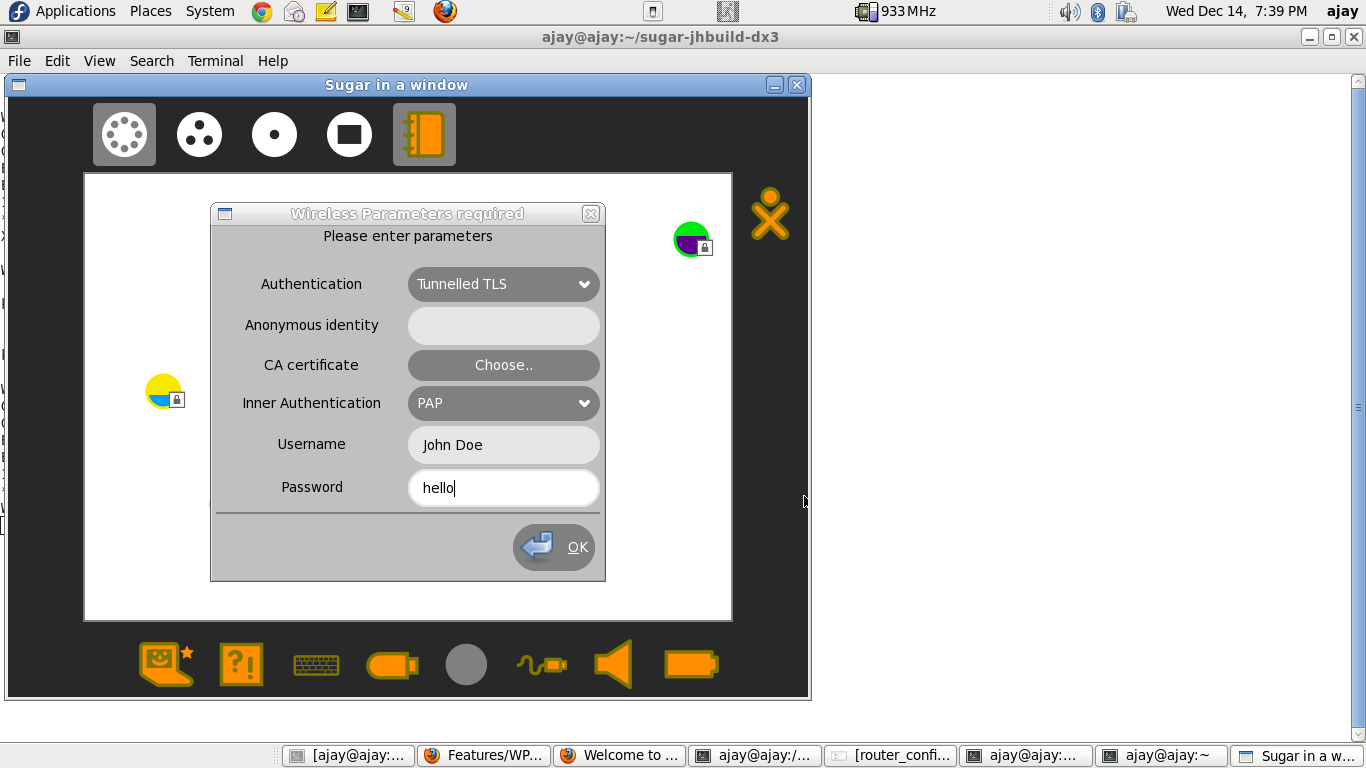
| + | * Click on the network-icon, and enter the parameters, as seen in the following screenshot (thanks to Anish, for showing me this minimal configuration). | ||
| + | |||
| + | |||
| + | ** [[File:TTLS_authentication.png]] | ||
| + | |||
| + | |||
| + | * NOTES | ||
| + | ** The above configuration is a minimalistic configuration. However, the parameters-cum-secrets modal-dialog, has been modelled on nm-applet. | ||
| + | |||
| + | |||
| + | |||
| + | |||
| + | |||
| + | |||
| + | == Connecting a client - PEAP-based authentication == | ||
| + | * Navigate to the "Neighbourhood view" on the XO. | ||
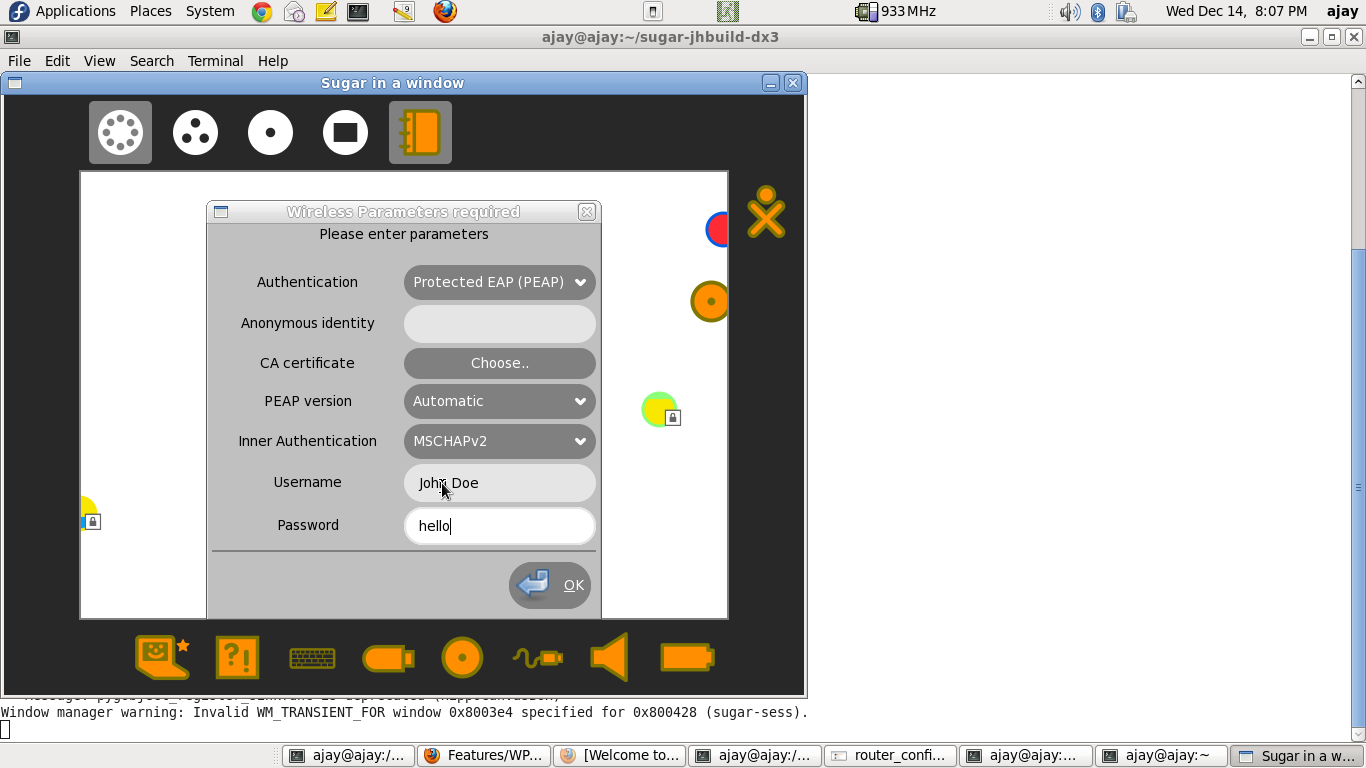
| + | * Click on the network-icon, and enter the parameters, as seen in the following screenshot. | ||
| + | |||
| + | |||
| + | ** [[File:PEAP_authentication.png]] | ||
| + | |||
| + | |||
| + | * NOTES | ||
| + | ** The above configuration is a minimalistic configuration. However, the parameters-cum-secrets modal-dialog, has been modelled on nm-applet. | ||
Latest revision as of 16:01, 2 January 2013
Setting up a RADIUS server (on a dedicated machine)
- Install "freeradius" rpm package
- sudo yum install freeradius
- Stop the server (if running)
- sudo killall radiusd
- Modify "/etc/raddb/clients.conf", to include the name of the network access-point/router. Sample files are present at
- Modify "/etc/raddb/users", to configure a username-password pair for authentication. Sample files are present at
- Fedora 17 users, please run the following command, before starting the radius server:
- sudo mv /etc/raddb/modules/dhcp_sqlippool ~
- Start the server, by issuing the following command:
- sudo /usr/sbin/radiusd -X &
Setting up the access-point / router
- Connect the access-point/router, with the RADIUS server machine, through a ethernet cable.
- Through the RADIUS server machine, open the browser, type in the access-point/router IP address, and configure it for WPA/WPA2-Enterprise authentication. A sample screenshot is presented below
- Note that, you may only need to enter the "Radius Server IP Address" ("192.168.1.3" in the screenshot). The "Radius Server Port", and "Share Secret" are the default ones (at least for a default setup of freeradius).
Connecting a client - TLS-based authentication
- Make sure you have three certificates - user-certificate, ca-certificate, private-key - before you proceed. One way to get these certificates is as follows:
- Go to the RADIUS server machine, and navigate to "/etc/raddb/certs"
- Run the following commands
- sudo make client.pem
- sudo chmod 0644 client.p12
- sudo chmod 0644 ca.pem
- Transfer "client.p12" and "ca.pem" to a USB drive.
- Use this USB drive, in the subsequent steps.
- Navigate to the "Neighbourhood view" on the XO.
- Click on the network-icon, and enter the parameters, as seen in the following screenshot
- NOTES
- If either of "User Certificate", or "Private Key" is in ".p12" format, both these entries should be EXACTLY equal, since the ".p12" certificate contains both.
- For entering the "User certificate", "CA certificate" and "Private Key", you will be taken to the "Journal-Chooser". You may use the certificates that were retrieved earlier.
Connecting a client - LEAP-based authentication
- Help required !!!!
- We have not been able to set-up a LEAP-authentication-supported access-point / router.
- Any CISCO guys !!??
Connecting a client - TTLS-based authentication
- Navigate to the "Neighbourhood view" on the XO.
- Click on the network-icon, and enter the parameters, as seen in the following screenshot (thanks to Anish, for showing me this minimal configuration).
- NOTES
- The above configuration is a minimalistic configuration. However, the parameters-cum-secrets modal-dialog, has been modelled on nm-applet.
Connecting a client - PEAP-based authentication
- Navigate to the "Neighbourhood view" on the XO.
- Click on the network-icon, and enter the parameters, as seen in the following screenshot.
- NOTES
- The above configuration is a minimalistic configuration. However, the parameters-cum-secrets modal-dialog, has been modelled on nm-applet.


