Activities/Turtle Art/Plugins
Plugins
As of Version 106, there is plugin support for Turtle Art. The basic idea is to let developers add new palettes and blocks to support additional functionality without having to make changes to any of the core Turtle Art packages. If a plugin is present, it is loaded when Turtle Art is launched and any palettes or blocks defined by the plugin are made available to the user.
The plugin mechanism is currently used to provide support for sensors, the camera, RFID, and the Media, Extras, and Portfolio palettes. A plugin has been developed for WeDo (and here) and additional plugins are being developed for Arduino, NXT, and GoGo.
How to install a plugin
Plugins are typically distributed as a *.tar.gz archive.
In versions 137+, there is a built-in method for installing plugins from Turtle Art itself:
- Download the plugin to your Sugar Journal, a USB key, or $HOME/Documents.
- Click on the 'Load plugin' button found on the Activity toolbar.
- Select the plugin downloaded in Step 1.
- Go to the Palette toolbar to confirm that the plugin has installed and loaded properly.
In early versions of Turtle Art, please follow these instructions:
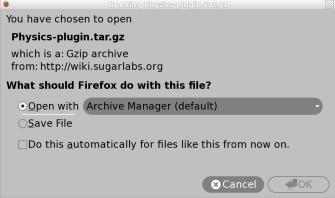
In Gnome, click on the link in your browser and open with Archive Manager, extract the files in the plugins directory of the archive to
/home/olpc/Activities/TurtleArt.activity/plugins
you may need to make the Activities directory writeable first, in Terminal type
chmod 777 /home/olpc/Activities
If your distribution does not include Gnome, the following commands in Terminal will download the Physics archive to the current directory
cd ~/Activities/TurtleArt.activity
wget http://wiki.sugarlabs.org/images/c/c1/Physics-plugin.tar.gz
gunzip Physics-plugin.tar.gz
tar xvf Physics-plugin.tar
Note that you should not need root access to install plugins into your home directory.
Available plugins
These plugins would typically already be installed
- turtleart-extras (the extra palettes that distinguish Turtle Blocks from Turtle Art)
- turtleart-camera
- turtleart-sensors
- rfid (This plugin allows interfacing with a RFID reader)
Butia
Add a palette to control the Butiá robot
Andrés Aguirre is part of the Butiá team in Montevideo:
- We have released the 1.0 version of the sources, which has full integration with tortugarte (http://www.fing.edu.uy/inco/proyectos/butia/publicaciones.html). Last month we gave away nearly 30 Butiá robots in a robotic event organized by the University. These robots were given to secondary schools throughout the country, in this event we gave some tutorials and exercises to do with our help. One of the schools made a great line follower in tortugarte ;) : http://www.youtube.com/watch?v=Szp0LWLyPIg Then on the second day we give some tutorials and some children really enjoyed the experience, like Pedro a 10 year old child who really has programming skills! http://www.flickr.com/photos/butiarobot/5059177334/ http://www.youtube.com/aguirrea#p/u/7/p0y11iyhFko
- In future months we will go to the schools where we give the robots to continue teaching and giving new challenges. If you would like to see more about Butiá, we have a flickr site: http://www.flickr.com/photos/butiarobot/ and also a web page: http://www.fing.edu.uy/inco/proyectos/butia
GIT code
Download
FollowMe
This plugin uses the camera and get the position of an object of a color.
The plugin add this palette:

Examples
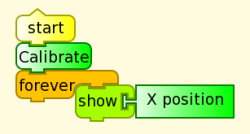
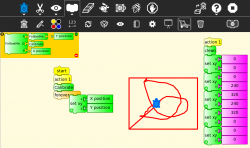
The "classic" use: on "Start", use the "Calibrate" block to open a window that shows the camera output. In the center of that window there is red square. The FollowMe Plugin uses an algorithm that obtains the "promedial" color of the object in the square. The result of that algorithm is shown in a small square in the corner. When you consider that the color is a good "representation of the object", press any key, the window will close, and FollowMe will use this color. After calibration, you can use the "X position" and "Y position" blocks. The block "X position" is the "center" of the object seen by the camera along the "X" (horizontal) axis. This value is an integer between 0 and 320. When the object is not detected,the algorithm returns -1. The operation of the "Y position" block are the same, but returns the position respect the "Y" (vertical) axis. The value returned is between 0 and 240.
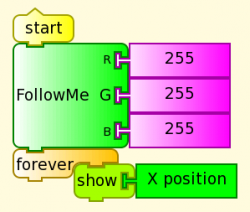
When you know the color to "follow" (it occurs rarely, since the color varies under changing light conditions) you can use the "Follow RGB" block. This block sets the color directly to the algorithm. In all cases, the color has a threshold of 25 in each component set by default. With the "Threshold" block this value can be changed.
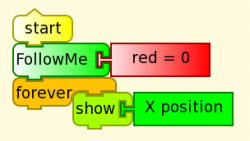
The third option, is to use the "FollowMe" block that "follows" a generic color similar to that shown.
Videos of the plugin ongoing:
FollowMe plugin in TurtleArt - Part 1
FollowMe plugin in TurtleArt - Part 2
The code used in this videos:
Download
WeDo
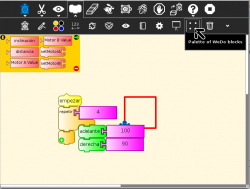
Tony Forster created a WeDo plugin based on the work of I.T. Daniher.
The source code repository is available here: [1].
Download
File:Wedo plugin.tar.gz WeDo plugin
Note: Check out https://github.com/itdaniher/WeDoMore/tree/master/udev for instructions on how to setup the proper permissions talk to the device. In the new versions of Sugar the udev is included.
LEGO NxT
Examples
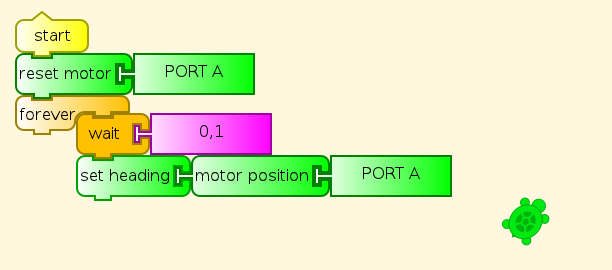
Moving the Turtle:
A crane: Example of Crane
GIT code
You can see all code in: NXT_plugin GIT
Downloads
LEGO NxT Plugin File:Nxt plugin.tar.gz
Arduino
The Arduino Plugin:
There are several efforts to develop Turtle Art support for Arduino.
- Setting up Turtle Arduino
- Read digital inputs File:Ard.ta
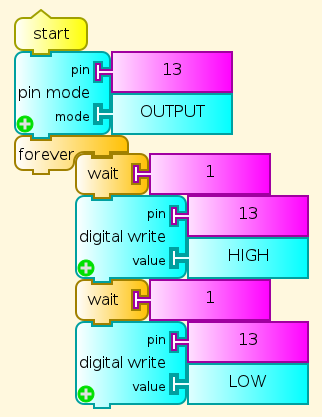
- Arduino write output File:Turtle Art Activity ardout.ta File:Tamyblock mouse.odt
- The Freetronics Leostick
The Arduino functionality was corrected from previous versions:
- Analog and digital reading now works correctly
- Auto detection of ttyUSBx port for FTDI device (Arduino board uses this for USB)
It requires the Firmata protocol to be uploaded to the Arduino board. Use the latest Firmata version (2.1 as of now) downloaded from the Firmata page (firmata.org) The Firmata version included with the Arduino IDE has some inconsistencies.
This version has english and spanish translations.
Examples
GIT code
You can see all code in: arduino_plugin GIT
Downloads
The plugin file can be downloaded from File:Arduino.tar.gz.
Currency
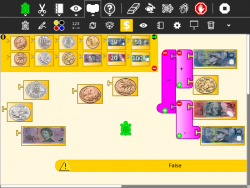
This plugin adds a pallette of currency (notes and coins), these items can be acted on by arithmetic operators
- File:Oz-coins.tar.gz Australian coins plugin
- File:Oz-bills.tar.gz Australian bills plugin
- File:Oz-coins-and-bills.tar.gz Australian coins and bills plugin
- File:Colombia-currency.tar.gz Colombian peso plugin
- File:Mexican-currency.tar.gz Mexican peso plugin
- File:Paraguay-currency.tar.gz Paraguay Gurani plugin
- File:Rwanda-currency.tar.gz Rwanda francs plugin
- File:UY-currency.tar.gz Uruguayan peso plugin
- File:US-bills.tar.gz US dollars plugin
:File:US-currency.tar.gz US dollars plugin
Nutrition
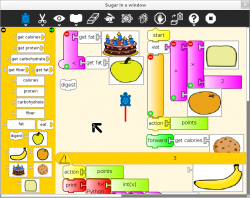
This is just a first rough pass at a plugin do calculations on the nutritional value of different food types. The plugin itself comes with some sample foods: apples, bananas, cookies, and cake. It is expected that the food choices will be customized by deployment. See https://www.choosemyplate.gov/SuperTracker/ for nutritional values (calories, protein, carbohydrates, fiber, and fat) of different foods.
Downloads
File:Food-plugin.tar.gz (Note: Requires TurtleBlocks v133 or greater)
Physics
This plugin allows you to construct a Physics model which can be saved to the Journal and run with the Physics Activity Activities/Physics
Use these blocks to create objects that are added to the bodylist and jointlist of a Box2d database used by the Physics Activity. Objects are positioned by the turtle x,y and colored based on the current pen attributes. From left to right:
- start polygon: use the current turtle x,y position to specify the first vertex of a polygon
- add point: use the current turtle x,y position to add a vertex to a polygon
- end polygon: use the current turtle x,y position to specify the last vertex of a polygon
- end filled polygon: use the current turtle x,y position to specify the last vertex of a filled polygon
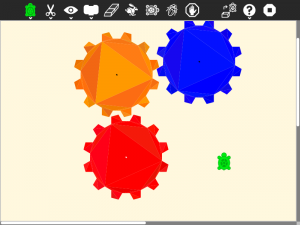
- Note: The polygon must be 'normal', e.g., no crossed lines; no holes. Since Box2d does not support concave polygons, all polygons are converted to triangles (triangulation). (In Turtle Blocks, these triangles are shown by slight variations in color.)
- triangle: add a triangle object at the current turtle x,y position
- circle: add a circle object at the current turtle x,y position
- rectangle: add a rectangle object at the current turtle x,y position
- gear: add a gear object at the current turtle x,y position with the number of teeth as the argument
- motor: add a motor at the current turtle x,y position (attached to the object at this position)
- pin: add a pin at the current turtle x,y position (attached to the object at this position)
- joint: add a joint between the object at the current turtle x,y position and the object at x, y
- density: set the object density (0 is light; 1 is heavy)
- friction: set the object friction (0 is slippery; 1 is sticky)
- bounciness: set the object restitution (0 is rigid; 1 is bouncy)
- save as Physics project: save the current bodylist and jointlist as a Physics project in the Journal
Note: The current model is cleared whenever the Erase button is pressed or a Clean block is run.
Example
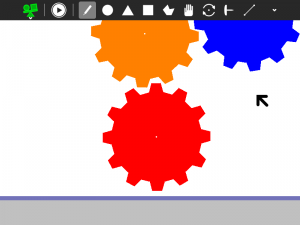
A simple gear and motor generated in Turtle Art:
File:TAgear.ta File:Gear.physics
Downloads
File:Physics-plugin.tar.gz Physics plugin
TurtleArt + icaro = Tortucaro
See http://proyectofedora.org/argentina/?p=320
How to write a plugin
Your plugin should be placed in a subdirectory of the plugins directory. In that subdirectory, you need to create a .py file that defines a subclass of the Plugin class. The directory and .py file must have the same name and the subclass must also have the same name, with the additional requirement that the first letter of the class name be capitalized.
For example:
- the camera plugin,
camera_sensor.pyis in./plugins/camera_sensor - the class,
Camera_sensoris defined incamera_sensor.py, e.g.,
from plugins.plugin import Plugin
class Camera_sensor(Plugin):
In that subdirectory, you will also need a __init__.py file (which can be empty) and optionally, an icon subdirectory for your palette icon.
Turtle Art calls the __init__ method when starting up and traps import errors as its means to determine whether or not a plugin has the resources it needs to run. (You may want to remove this exception handler when debugging your plugin. It is in the _init_plugins method in tawindow.py.) It then calls the setup method when creating the palettes. It calls the start method whenever a stack of blocks is run and the stop method when execution is over. Also, there are methods for goto_background, return_to_foreground, and quit. (These methods are typically ignored.)
Adding a new palette is simply a matter of:
   palette = make_palette('mypalette',  # the name of your palette
                          colors=["#00FF00", "#00A000"],
                          help_string=_('Palette of my custom commands'))
For example, if we want to add a new turtle command, 'uturn', we'd use the add_block method in the Palette class.
   palette.add_block('uturn',  # the name of your block
                     style='basic-style',  # the block style
                     label=_('u turn'),  # the label for the block
                     prim_name='uturn',  # code reference (see below)
                     help_string=_('turns the turtle 180 degrees'))
   # Next, you need to define what your block will do:
   # def_prim takes 3 arguments: the primitive name, the number of
   # of arguments, 0 in this case, and the function to call, in this
   # case, the canvas function to set the heading.
   self.tw.lc.def_prim('uturn', 0, lambda self: self.tw.canvas.seth(self.tw.canvas.heading + 180))
That's it. When you next run Turtle Art, you will have a 'uturn' block
on the 'mypalette' palette.
You will have to create icons for the palette-selector buttons. These are kept in the icons subdirectory. You need two icons: mypaletteoff.svg and mypaletteon.svg, where 'mypalette' is the same string as the entry you used in instantiating the Palette class. Note that the icons should be the same size (55x55) as the others. (This is the default icon size for Sugar toolbars.)
As of Turtle Art v137, there is a built-in mechanism for installing plugins. Please include a plugin.info file in the top level of your tar.gz bundle.
plugin.info
myplugin
   myplugin.py
   __init.py__
   icons
      mypluginoff.svg
      mypluginon.svg
The plugin.info file must contain the following sections and fields:
[Plugin]
name=the name of your plugin
palette=the names of any palettes created by your plugin as a comma-separated list
e.g.,
[Plugin]
name=food
palette=eatme, food
Other fields, such as version, license, etc. may be used in the future.
